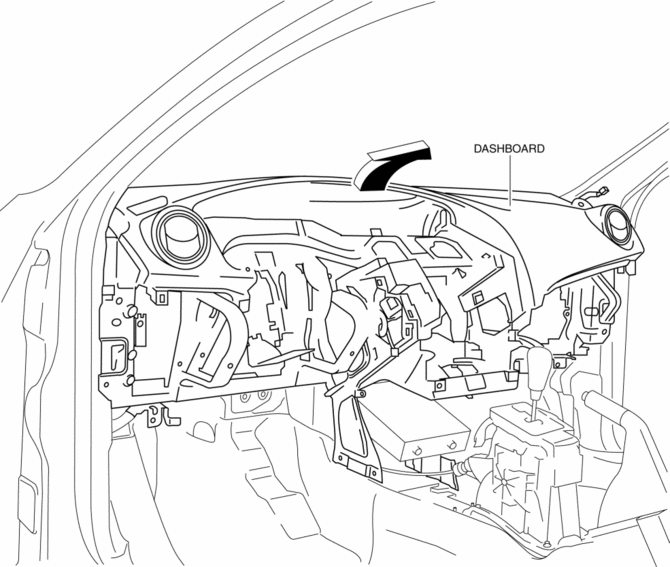
Mazda 3 Service Manual: Dashboard Removal/Installation
1. Set the air intake mode to FRESH.
2. Set the air mix mode to MAX COLD.
3. Disconnect the negative battery cable..
4. Remove the following parts:
a. Front doors.
b. Front scuff plate.
c. Front side trim.
d. Dashboard under cover.
e. Glove compartment.
f. Upper panel.
g. Shift lever knob (MTX).
h. Selector lever knob (ATX).
i. Shift panel.
j. Side wall.
k. Console.
l. Shift lever component (MTX).
m. Selector lever component (ATX).
n. Hood release lever.
o. Lower panel.
p. Knee bolster.
q. Driver-side air bag module.
r. Steering wheel.
s. Column cover.
t. Combination switch.
u. Joint cover.
v. Steering shaft.
w. Center panel.
x. Audio unit.
y. Climate control unit.
z. Instrument cluster.
aa. Center cover.
ab. Dashboard upper panel.
ac. Hole cover.
ad. Information display.
ae. A-pillar trim.
af. Windshield wiper arm and blade.
ag. Front fender molding.
ah. Cowl grille.
ai. Windshield wiper motor.
5. Disconnect The blower motor connector..
6. Disconnect the dashboard harness connectors.
7. Remove the shower duct..
8. Remove the heater case..
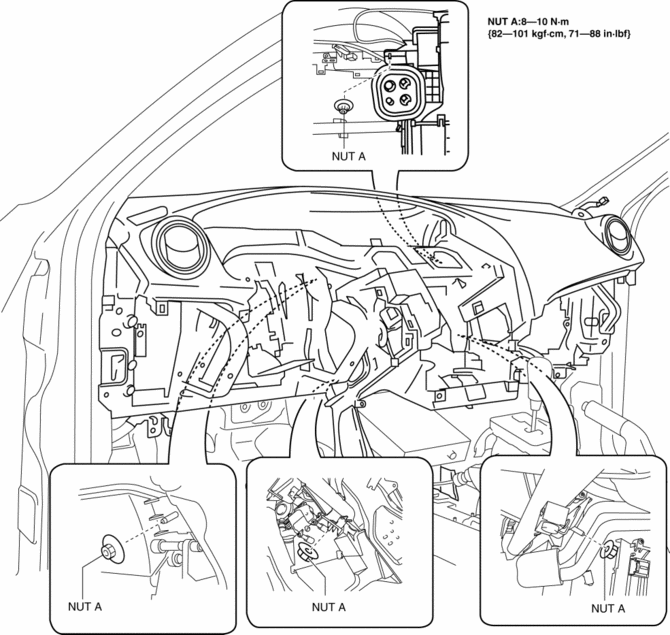
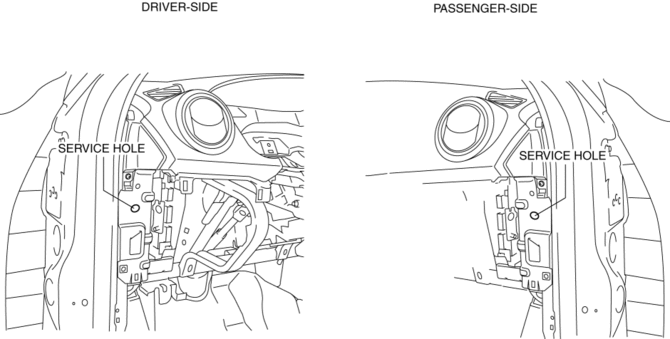
9. Remove the nuts A.
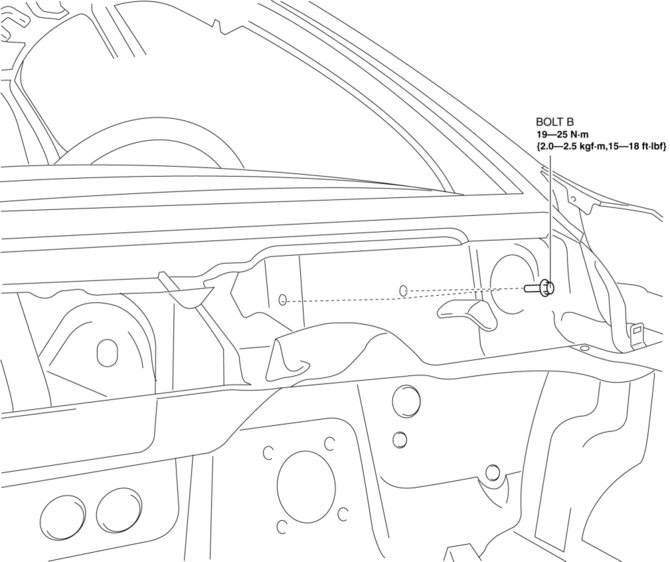
10. Remove the bolts B.
11. Remove the caps then set the rolled paper.
12. Remove the bolts C.

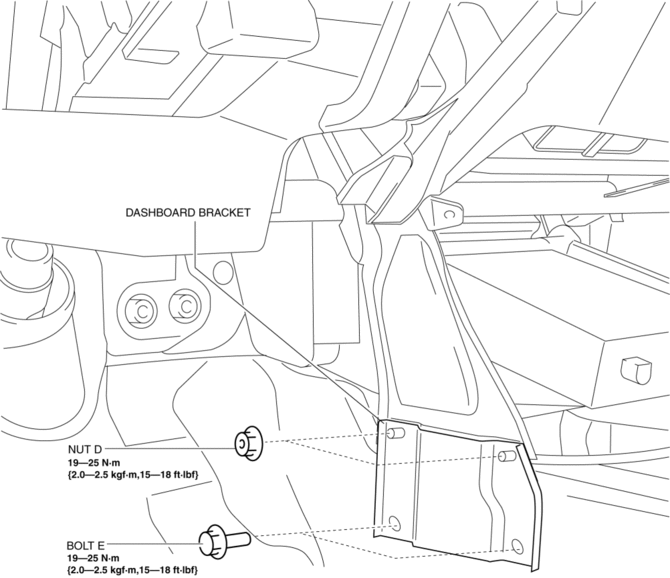
13. Remove the nuts D and bolts E then remove the dashboard bracket.
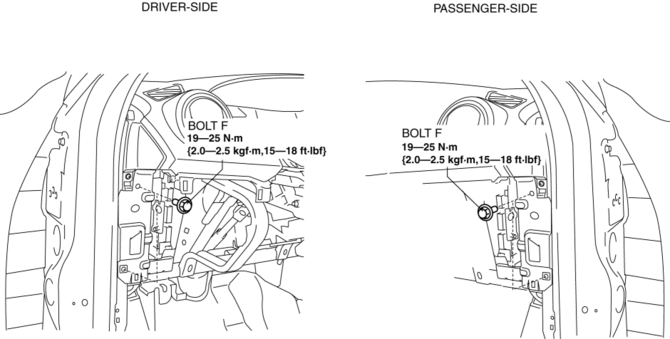
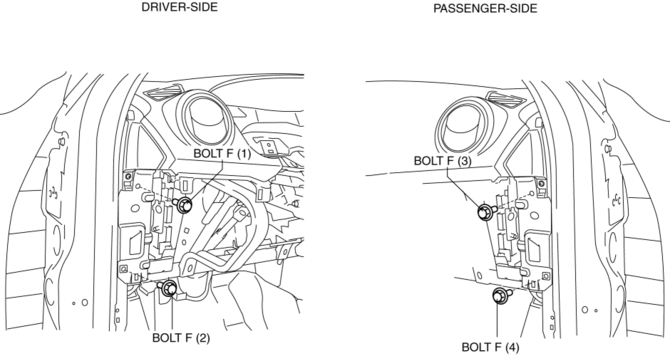
14. Remove the bolts F..
15. Raise the back side of the dashboard rotate it in the direction of the arrow shown in the figure.
WARNING:
-
Removing the dashboard without supporting it can be dangerous. The dashboard may fall and injure you. Always perform the following procedure with at least another person.
16. Remove the dashboard.
17. Take the dashboard off from the front driver-side door opening.
18. Install in the reverse order of removal.
Bolt F Installation Note
1. Fit the service hole of dashboard and hinge pillar inner shown in the figure.
2. Partially tighten the bolts F in the order (1), (2), (3), (4) shown in the figure.
3. Reconfirms fit the service hole of dashboard and hinge pillar inner, then tighten the upper side bolt F.
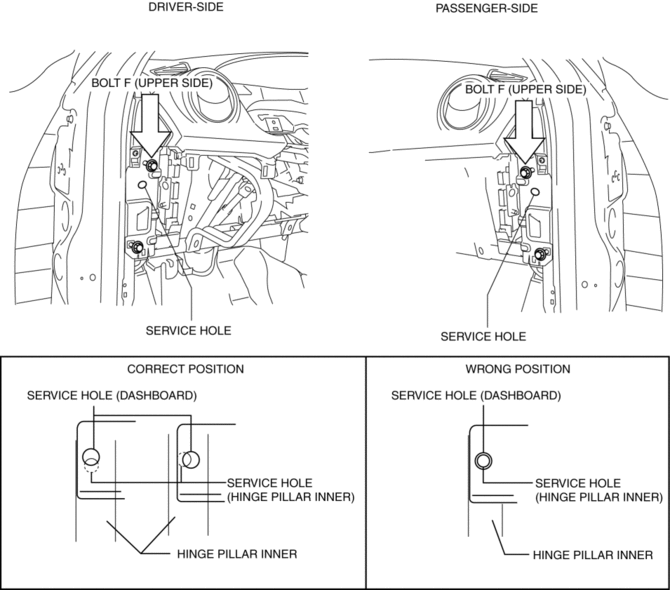
4. Tighten the all of bolts F.
 Dashboard Disassembly/Assembly
1. Remove the ventilator grilles..
2. Remove the Passenger-side air bag module..
3. Disassemble in the order indicated in the table.
4. Assemble in the reverse order of disassembly.
...
 Dashboard Under Cover Removal/Installation
1. Detach the hooks in the direction of arrow (1) shown in the figure.
2. Pull the dashboard under cover in the direction of arrow (2).
3. Remove the dashboard under cover, then remove the gui ...
Other materials:
Aerodynamic Under Cover No.2 Removal/Installation
Except SKYACTIV-G 2.0
1. Lift up the vehicle.
2. Remove the fasteners and bolts.
3. Move the aerodynamic under cover No.2 in the direction of the arrow shown
in the figure and remove it.
CAUTION:
Be careful not to damage the aerodynamic under cover No.2 during removal.
4. ...
Oil Seal (Differential) Replacement [A26 M R]
1. On level ground, jack up the vehicle and support it evenly on safety stands.
2. Drain the oil from the transaxle..
3. Remove the front tires..
4. Remove the splash shield..
5. Remove the aerodynamic under cover No.2..
6. Separate the drive shaft and joint shaft from the transaxle..
7 ...
Inspecting Engine Oil Level
Be sure the vehicle is on a level
surface.
Warm up the engine to normal
operating temperature.
Turn it off and wait at least 5 minutes
for the oil to return to the oil pan.
Pull out the dipstick, wipe it clean, and
reinsert it fully.
Pull it out again and examine the level ...
