Mazda 3 Owners Manual: Parking Brake
| CAUTION Driving with the parking brake on will cause excessive wear of the brake parts. |
NOTE For parking in snow, refer to Winter Driving regarding parking brake use.
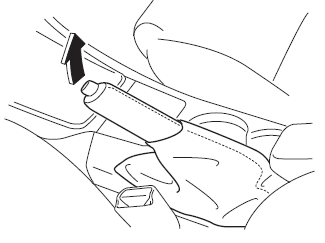
Setting the parking brake
Depress the brake pedal and then firmly pull the parking brake lever fully upwards with sufficient force to hold the vehicle in a stationary position.
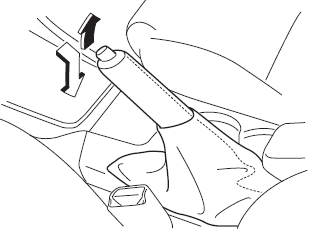
Releasing the parking brake
Depress the brake pedal and pull the parking brake lever upwards, then press the release button. While holding the button, lower the parking brake lever all the way down to the released position.
 Foot Brake
This vehicle has power-assisted brakes
that adjust automatically through normal
use.
Should power-assist fail, you can stop by
applying greater force than normal to the
brake pedal. But the dis ...
 Warning Light
The warning light turns on when the
system has a malfunction.
Refer to Warning Lights on .
Brake Pad Wear Indicator
When the disc brake pads become worn,
the built-in wear indicators contact th ...
Other materials:
Warning lights and indicators
The Subaru Solterra is equipped with a comprehensive set of warning
lights and indicators located on the instrument cluster and exterior mirrors, designed
to clearly communicate the current condition and operational status of various vehicle
systems to the driver in real time.
Warning lights ...
On Board Diagnostic System PID/Data Monitor Inspection [Fw6 A EL]
1. Connect the M-MDS (IDS) to the DLC-2.
2. After the vehicle is identified, select the following items from the initialization
screen of the IDS.
a. Select “DataLogger”.
b. Select “Modules”.
c. Select “TCM”.
3. Select the applicable PID from the PID table.
4. Verify th ...
Digital inner mirror
In the Subaru Solterra, the Digital inner mirror is an advanced visibility
system that utilizes a rear-mounted camera to project a real-time video image onto
the mirror display, significantly enhancing rearward visibility in various driving
conditions.
The Subaru Solterra Digital inner mirr ...
