Mazda 3 Service Manual: Engine Coolant Temperature (ECT) Sensor Removal/Installation [Mzr 2.0, Mzr 2.5]
WARNING:
-
When the engine is hot, it can badly burn. Turn off the engine and wait until it is cool before removing the ECT sensor.
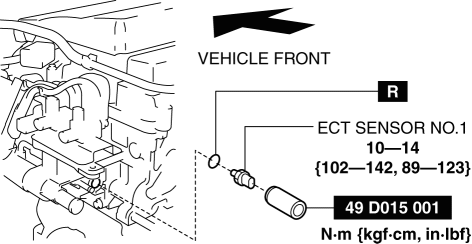
ECT Sensor No.1
1. Remove the battery cover..
2. Disconnect the negative battery cable..
3. Drain the engine coolant..
4. Remove the battery and battery tray..
5. Disconnect the ECT sensor No.1 connector.
6. Remove the ECT sensor No.1 using the SST
.
7. Install in the reverse order of removal.
8. Refill the engine coolant..
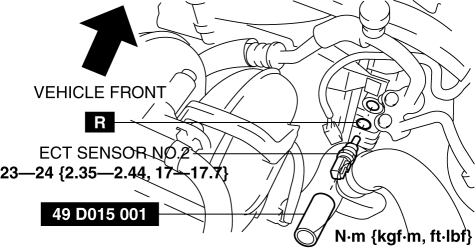
ECT Sensor No.2
1. Remove the battery cover..
2. Disconnect the negative battery cable..
3. Drain the engine coolant..
4. Disconnect the ECT sensor No.2 connector.
5. Remove the ECT sensor No.2 using the SST
.
NOTE:
-
Wipe off any oil or engine coolant if it gets on the ECT sensor No.2 installation area.
6. Install in the reverse order of removal.
7. Refill the engine coolant..
 Engine Coolant Temperature (ECT) Sensor Inspection [Mzr 2.0, Mzr 2.5]
ECT Sensor No.1
Resistance inspection
WARNING:
When the engine is hot, it can badly burn. Turn off the engine and wait until
it is cool before removing the ECT sensor.
1. Remove the ...
 Fan Switch Inspection [Manual Air Conditioner]
1. Disconnect the negative battery cable..
2. Remove the following parts:
a. Upper panel.
b. Shift lever knob (MTX).
c. Selector lever knob (ATX).
d. Shift panel.
e. Side wall.
f. Consol ...
Other materials:
Engine Coolant Temperature (ECT) Sensor Inspection [Mzr 2.0, Mzr 2.5]
ECT Sensor No.1
Resistance inspection
WARNING:
When the engine is hot, it can badly burn. Turn off the engine and wait until
it is cool before removing the ECT sensor.
1. Remove the battery cover..
2. Disconnect the negative battery cable..
3. Drain the engine coolant..
4. R ...
Inner Garnish Removal/Installation
1. Disconnect the negative battery cable..
2. Pull the inner garnish in the direction of the arrow shown in the figure and
remove it while detaching clips and tab.
CAUTION:
When pulling out the inner garnish, be careful not to damage the tab.
3. Disconnect the front tweeter c ...
Rear Power Window Regulator Removal/Installation
1. Fully lower the rear door glass.
2. Disconnect the negative battery cable..
3. Remove the rear door trim..
4. Remove the service hole cover.
5. Remove the rear door speaker..
6. Remove the glass guide..
7. Remove the rear power window motor..
8. Remove the rear door glass..
9. ...
