Mazda 3 Service Manual: Front Seat Belt Removal/Installation [Two Step Deployment Control System]
WARNING:
-
Handling the front seat belt (pre-tensioner seat belt) improperly can accidentally deploy the pre-tensioner seat belt, which may seriously injure you. Read the air bag system service warnings and cautions before handling the front seat belt..
WARNING:
-
The side air bag sensor is attached to the lower part of the B-pillar. When working around the B-pillar, disconnect the negative battery cable avoiding excessive impact to the lower part of the B-pillar.
CAUTION:
-
The ELR (emergency locking retractor) has a spring that will unwind if the retractor cover is removed. The spring cannot be rewound by hand. If this occurs, the ELR will not work properly. Therefore, do not disassemble the retractor.
Driver-side
1. Switch the ignition to off.
2. Disconnect the negative battery cable and wait for 1min or more
..
3. Remove the front scuff plate..
4. Remove the rear scuff plate..
5. Remove the B-pillar lower trim..
6. Remove the fastener.
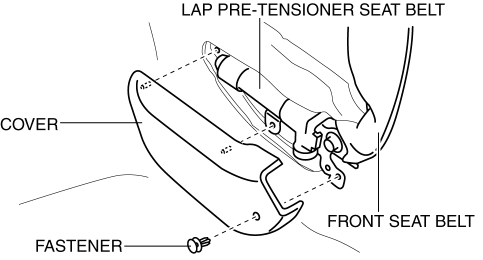
7. Remove the cover.
8. Remove the bolt A.
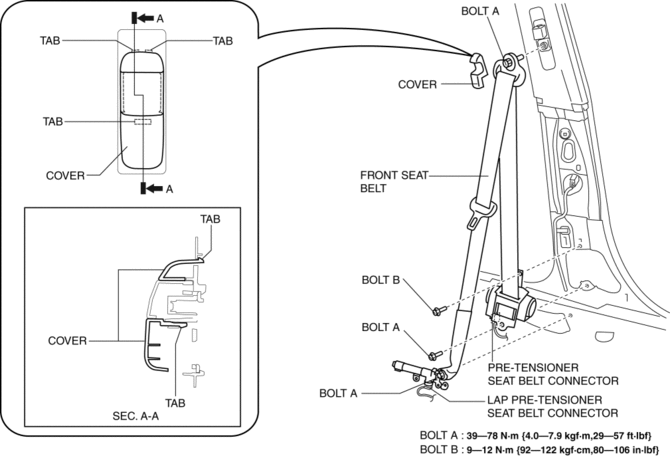
9. Remove the bolt B.
10. Remove the front seat belt.
11. Using a flathead screwdriver, lift the locking device carefully, however do not remove it.
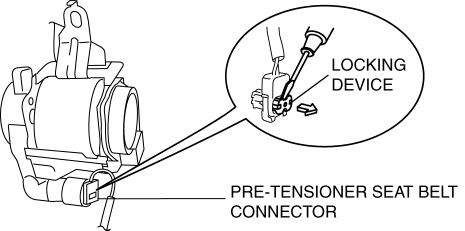
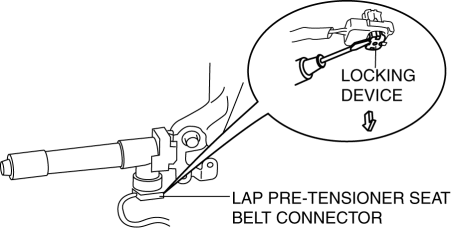
12. Disconnect the pre-tensioner seat belt connector.
13. Disconnect the lap pre-tensioner seat belt connector.
14. Install in the reverse order of removal.
15. Switch the ignition to ON.
16. Verify that the air bag system warning light illuminates for approx. 6 s
and goes out.
-
If the air bag system warning light does not operate, refer to the on-board diagnostic system (air bag system) and perform inspection of the system..
Passenger-side
1. Switch the ignition to off.
2. Disconnect the negative battery cable and wait for 1min or more
..
3. Remove the front scuff plate..
4. Remove the rear scuff plate..
5. Remove the B-pillar lower trim..
6. Remove the cover.
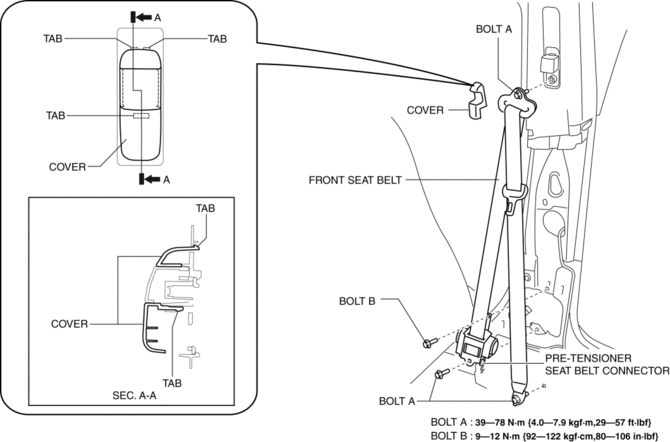
7. Remove the bolt A.
8. Remove the bolt B.
9. Remove the front seat belt.
10. Using a flathead screwdriver, lift the locking device carefully, however do not remove it.

11. Disconnect the pre-tensioner seat belt connector.
12. Install in the reverse order of removal.
13. Switch the ignition to ON.
14. Verify that the air bag system warning light illuminates for approx. 6 s
and goes out.
-
If the air bag system warning light does not operate, refer to the on-board diagnostic system (air bag system) and perform inspection of the system..
 Front Seat Belt Removal/Installation [Standard Deployment Control System]
WARNING:
Handling the front seat belt (pre-tensioner seat belt) improperly can accidentally
deploy the pre-tensioner seat belt, which may seriously injure you. Read the
air bag system ...
 Rear Buckle Removal/Installation
Rear Buckle (RH) and Rear Buckle (Center)
1. Remove the rear seat cushion..
2. Remove the bolt.
3. Remove the rear buckle (RH) and rear buckle (center).
4. Install in the reverse order of ...
Other materials:
Glass Panel Adjustment
1. Fully close the glass panel.
2. Measure the gap and height between the glass panel and body.
If not as specified, loosen the glass panel installation screws and reposition
the glass panel.
Clearance (4SD)
a: -2.4—0.2 mm {-0.09—0.01 in}
b: 0 mm {0 in}
...
Locking, Unlocking with Request
Switch (With the advanced keyless
function)
All doors and the liftgate can be locked/
unlocked by pressing the request switch
on the front doors while the key is being
carried.
(5–door)
The request switch on the liftgate can only
be used to lock all doors and the liftgate.
Front doors
Liftgate (5-door Lock only)
To lock
To l ...
Crankshaft Position (CKP) Sensor Inspection [Mzr 2.0, Mzr 2.5]
Visual Inspection
CAUTION:
When foreign material such as an iron chip is on the CKP sensor, it can cause
abnormal output from the sensor because of flux turbulence and adversely affect
the engine control. Be sure there is no foreign material on the CKP sensor when
replacing.
...
