Mazda 3 Service Manual: Sunroof Motor Inspection
1. Disconnect the negative battery cable..
2. Remove the rain sensor cover. (Vehicles with auto light/wiper system).
3. Disconnect the rain sensor connector. (Vehicles with auto light/wiper system)
4. Partially peel back the seaming welts.
5. Remove the following parts:
a. Sunroof seaming welt
b. A-pillar trim.
c. Front scuff plate.
d. Rear scuff plate.
e. B-pillar lower trim.
f. Upper anchor of the front seat belt.
g. B-pillar upper trim.
h. Rear seat cushion.
i. Tire house trim.
j. Trunk side upper trim (5HB).
k. C-pillar trim.
l. Map light.
m. Sunvisor.
n. Assist handle.
o. Headliner.
6. Measure the voltage at each terminal.
-
If not as specified, inspect the parts listed under “Inspection item” and the related wiring harnesses.
-
If the parts and wiring harnesses are normal but the system still does not work properly, replace the sunroof motor.
Terminal Voltage Table (Reference)
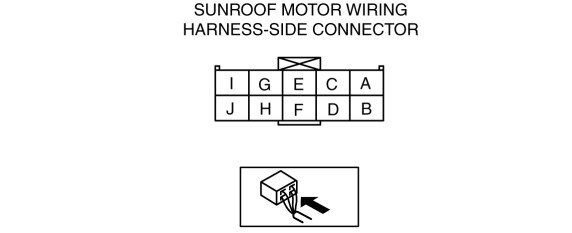
|
Terminal |
Signal |
Connected to |
Test condition |
Voltage (V) |
Inspection item |
|
A |
Slide open |
Sunroof switch |
Sunroof is fully opening. |
B+ |
Sunroof switch |
|
Other |
1.0 or less |
||||
|
B |
Slide close/tilt down |
Sunroof switch |
Sunroof is closing/tilting down. |
B+ |
Sunroof switch |
|
Other |
1.0 or less |
||||
|
C |
Tilt up |
Sunroof switch |
Sunroof is tilting up. |
B+ |
Sunroof switch |
|
Other |
1.0 or less |
||||
|
D |
— |
— |
— |
— |
— |
|
E |
IG2 |
HEATER 10 A fuse |
Switch the ignition ON. |
B+ |
HEATER 10 A fuse |
|
Other |
1.0 or less |
||||
|
F |
— |
— |
— |
— |
— |
|
G |
GND |
GND |
Under any condition |
1.0 or less |
GND |
|
H |
— |
— |
— |
— |
— |
|
I |
— |
— |
— |
— |
— |
|
J |
Power supply |
SUNROOF 15 A fuse |
Under any condition |
B+ |
SUNROOF 15 A fuse |
 Roof Carrier Bracket Removal/Installation
4SD
1. Disconnect the negative battery cable..
2. Remove the following parts:
a. Sunroof seaming welt (vehicles with sunroof)
b. Front scuff plate.
c. Rear scuff plate.
d. A-pillar trim.
...
 Sunroof Motor Removal/Installation
1. Disconnect the negative battery cable..
2. Remove the rain sensor cover. (Vehicles with auto light/wiper system).
3. Disconnect the rain sensor connector. (Vehicles with auto light/wiper system ...
Other materials:
Limitations to SRS Air Bag
In severe collisions such as those described previously in "SRS Air Bag
Deployment
Criteria", the applicable SRS air bag equipment will deploy. However, in some
accidents,
the equipment may not deploy depending on the type of collision and its
severity.
Limitations to front/near ...
Pre Delivery Inspection
Pre-Delivery Inspection Table
Exterior
INSPECT and ADJUST, if necessary, the following items to specification:
□ Glass, exterior bright metal and paint for damage
□ Wheel lug nuts
□ All weatherstrips for damage or detachment
□ Tire pressures
□ Headlight c ...
Brake Hose (Rear) Removal/Installation [Mzr 2.0, Skyactiv G 2.0]
CAUTION:
If the brake hose is installed to the caliper on the vehicle, the tool cannot
be installed correctly resulting in brake fluid leakage due to improper installation.
Therefore, remove the caliper and brake hose as a single unit when removing
the brake hose, and tighten the br ...
