Mazda 3 Service Manual: Roof Carrier Bracket Removal/Installation
4SD
1. Disconnect the negative battery cable..
2. Remove the following parts:
a. Sunroof seaming welt (vehicles with sunroof)
b. Front scuff plate.
c. Rear scuff plate.
d. A-pillar trim.
e. B-pillar lower trim.
f. Upper anchor of the front seat belt installation bolt.
g. B-pillar upper trim.
h. Rear seat cushion.
i. Tire house trim.
j. C-pillar trim.
k. Map light.
l. Sunvisor.
m. Assist handle.
n. Headliner.
3. Remove the nuts.
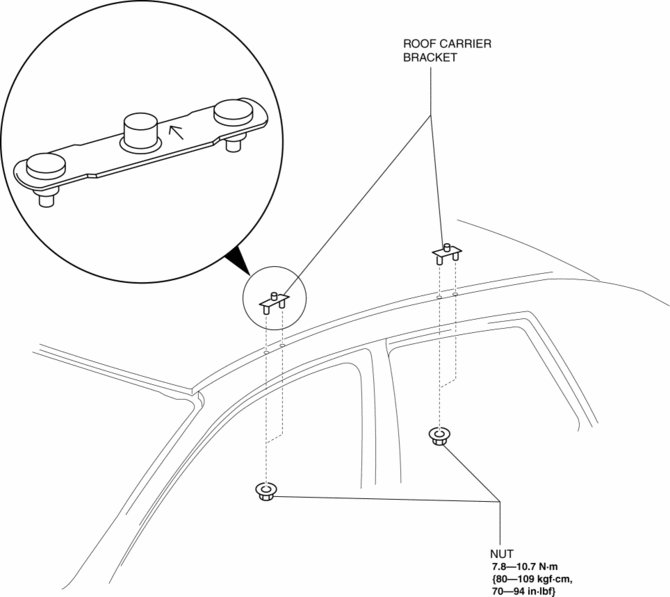
4. Remove the roof carrier bracket.
5. Install in the reverse order of removal.
NOTE:
-
Install the roof carrier bracket so that the arrow on it faces inward.
5HB
1. Disconnect the negative battery cable..
2. Remove the following parts:
a. Sunroof seaming welt (vehicles with sunroof)
b. Front scuff plate.
c. Rear scuff plate.
d. A-pillar trim.
e. B-pillar lower trim.
f. Upper anchor of the front seat belt installation bolt.
g. B-pillar upper trim.
h. Rear seat cushion.
i. Tire house trim.
j. Trunk side upper trim.
k. C-pillar trim.
l. Map light.
m. Sunvisor.
n. Assist handle.
o. Headliner.
3. Remove the nuts.
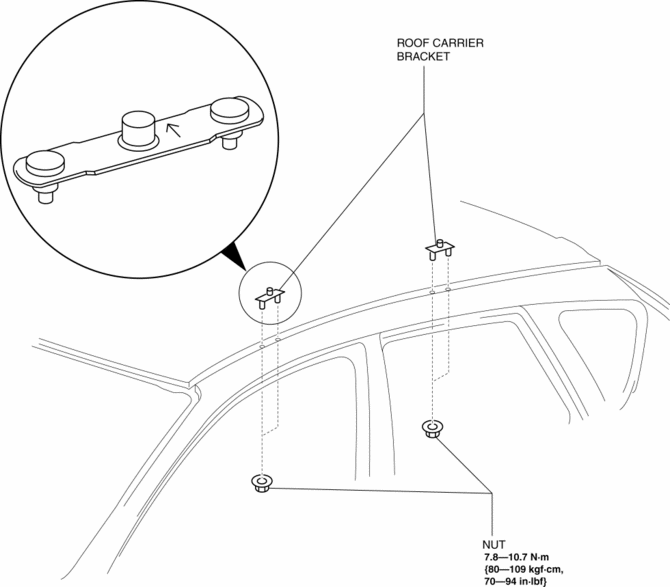
4. Remove the roof carrier bracket.
5. Install in the reverse order of removal.
NOTE:
-
Install the roof carrier bracket so that the arrow on it faces inward.
 Rear Drain Hose Removal
1. Disconnect the negative battery cable.
2. Remove the rain sensor cover. (Vehicles with auto light/wiper system).
3. Disconnect the rain sensor connector. (Vehicles with auto light/wiper system) ...
 Sunroof Motor Inspection
1. Disconnect the negative battery cable..
2. Remove the rain sensor cover. (Vehicles with auto light/wiper system).
3. Disconnect the rain sensor connector. (Vehicles with auto light/wiper system ...
Other materials:
Air Filter Removal/Installation [Mzr 2.0, Mzr 2.5]
Except for Mexico
1. Remove the fuel-filler pipe protector..
2. Remove in the order indicated in the table.
1
Evaporative hose
2
Air filter
3. Install in the reverse order of removal. ...
Driving In Flooded Area
WARNING
Dry off brakes that have become
wet by driving slowly, releasing the
accelerator pedal and lightly applying
the brakes several times until the brake
performance returns to normal:
Driving with wet brakes is dangerous.
Increased stopping distance or the
vehicle ...
Warm Up Three Way Catalytic Converter (Wu Twc) Inspection [Mzr 2.0, Mzr 2.5]
CAUTION:
Perform the following procedures, DTC P0421:00 is indicated only.
1. Connect the M-MDS to the DLC-2.
2. Start the engine and warm it up to normal operating temperature.
3. Turn off the engine.
4. Verify that the engine compression is within the specification..
...
