Mazda 3 Service Manual: Sunroof Motor Removal/Installation
1. Disconnect the negative battery cable..
2. Remove the rain sensor cover. (Vehicles with auto light/wiper system).
3. Disconnect the rain sensor connector. (Vehicles with auto light/wiper system)
4. Partially peel back the seaming welts.
5. Remove the following parts:
a. Sunroof seaming welt
b. A-pillar trim.
c. Front scuff plate.
d. Rear scuff plate.
e. B-pillar lower trim.
f. Upper anchor of the front seat belt.
g. B-pillar upper trim.
h. Rear seat cushion.
i. Tire house trim.
j. Trunk side upper trim (5HB).
k. C-pillar trim.
l. Map light.
m. Sunvisor.
n. Assist handle.
o. Headliner.
6. Disconnect the sunroof motor connector.
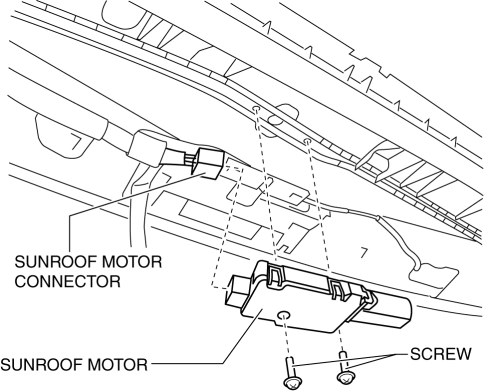
7. Remove the screws, and then remove the sunroof motor.
8. Install in the reverse order of removal.
NOTE:
-
If the glass panel or the sunroof motor is moved with the sunroof motor removed, initial position setting of the sunroof motor will be required. Perform initial position setting referring to the Sunroof Motor Assembly Note..
 Sunroof Motor Inspection
1. Disconnect the negative battery cable..
2. Remove the rain sensor cover. (Vehicles with auto light/wiper system).
3. Disconnect the rain sensor connector. (Vehicles with auto light/wiper system ...
 Sunroof Unit Disassembly/Assembly
NOTE:
If the guide or sunroof motor is removed, the glass panel will not be positioned
properly after the re-installation. To ensure proper positioning of the glass
panel, place alignmen ...
Other materials:
Brake Fluid Pressure Sensor Inspection
1. Switch the ignition to off.
2. Install the SSTs to the master cylinder (secondary side) as shown in
the figure.
NOTE:
When installing the SST (49 D043 0A0) to the master cylinder, use
a commercially available flare nut wrench (flare nut across flat 12 mm {0.47
in}).
...
Operating Tips for Audio System
WARNING
Always adjust the audio while the
vehicle is stopped:
Do not adjust the audio control
switches while driving the vehicle.
Adjusting the audio while driving
the vehicle is dangerous as it could
distract your attention from the vehicle
operation which could lead ...
Front Brake (Disc) Removal/Installation [Mzr 2.0, Skyactiv G 2.0, Mzr 2.5]
1. Remove in the order indicated in the table.
2. Install in the reverse order of removal.
3. After installation, pump the brake pedal a few times and verify that the brakes
do not drag.
1
Brake hose
(See Brake Hose Installation Note.)
2
...
