Mazda 3 Service Manual: Brake Hose (Rear) Removal/Installation [Mzr 2.0, Skyactiv G 2.0]
CAUTION:
-
If the brake hose is installed to the caliper on the vehicle, the tool cannot be installed correctly resulting in brake fluid leakage due to improper installation. Therefore, remove the caliper and brake hose as a single unit when removing the brake hose, and tighten the brake hose to the caliper to the specified torque, then install the caliper and brake hose as a single unit when installing to the vehicle.
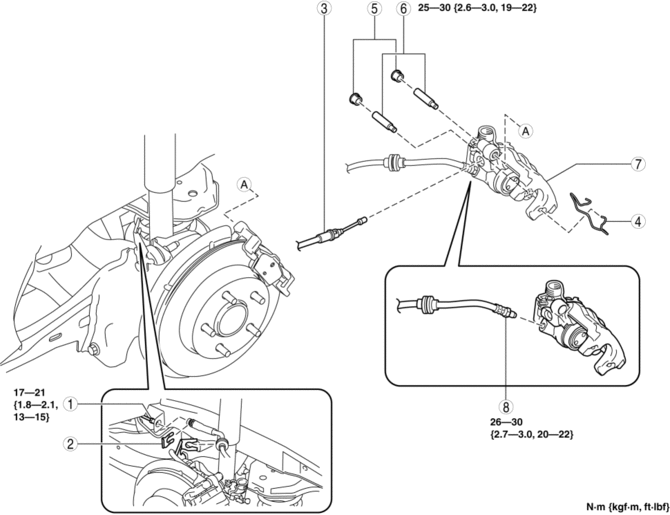
1. Remove in the order indicated in the table.
2. Install in the reverse order of removal.
3. Add brake fluid, bleed the brakes, and inspect for leakage after the installation has been completed..
|
1 |
Brake pipe (See Clip and Brake Pipe Installation Note.) |
|
2 |
Clip (See Clip and Brake Pipe Installation Note.) |
|
3 |
Parking brake cable (See PARKING BRAKE LEVER REMOVAL/INSTALLATION.) |
|
4 |
Retaining clip |
|
5 |
Cap |
|
6 |
Bolt |
|
7 |
Caliper, brake hose (See Caliper and Brake Hose Removal Note.) (See Caliper and Brake Hose Installation Note.) |
|
8 |
Brake hose (See Brake Hose Installation Note.) |
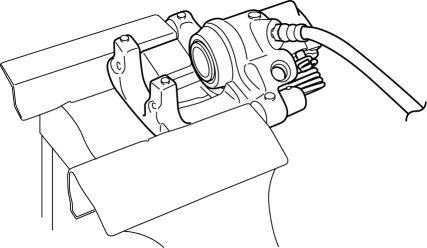
Caliper and Brake Hose Removal Note
1. Remove the caliper and brake hose from the vehicle as a single unit.
Brake Hose Installation Note
1. Secure the caliper to the vise and install the brake hose to it.
CAUTION:
-
Insert a protective plate into the vise opening so as not to damage the caliper.
2. Tighten the brake hose to the specified torque.
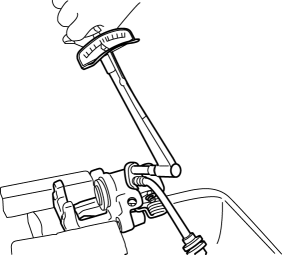
-
Tightening torque
-
26—30 N·m {2.7—3.0 kgf·m, 20—22 ft·lbf}
Caliper and Brake Hose Installation Note
1. Install the caliper and brake hose to the vehicle as a single unit.
Clip and Brake Pipe Installation Note
1. Install the brake hose to the vehicle-side bracket and secure it using a clip.
2. Verify that the brake hose is not twisted.
3. Tighten the brake pipe to the specified torque using a commercially available flare nut wrench.
 Brake Hose (Front) Removal/Installation [Mzr 2.3 Disi Turbo]
1. Remove in the order indicated in the table.
2. Install in the reverse order of removal.
3. Add brake fluid, bleed the brakes, and inspect for leakage after the installation
has been completed ...
 Brake Hose (Rear) Removal/Installation [Mzr 2.5, Mzr 2.3 Disi Turbo]
1. Remove in the order indicated in the table.
2. Install in the reverse order of removal.
3. Add brake fluid, bleed the brakes, and inspect for leakage after the installation
has been completed ...
Other materials:
Variable Valve Timing Actuator Removal/Installation [Mzr 2.0, Mzr 2.5]
NOTE:
Variable valve timing actuator can not be disassembled because it is a
precision unit.
Intake camshaft sprocket is integrated with the variable valve timing actuator
and cannot be disassembled.
1. Remove the battery cover..
2. Disconnect the negative battery cable ...
Operating Tips
Operate the climate control system with
the engine running.
To prevent the battery from being
discharged, do not leave the fan control
dial on for a long period of time with the
ignition switched ON when the engine is
not running.
Clear all obstructions such as leaves,
snow and ic ...
Front Door Key Cylinder Switch Inspection
1. To access the glass installation bolt, position the front door glass so that
the distance from the top of the front door glass to the upper part of the front
beltline molding is approx. 80 mm {3.1 in}.
2. Disconnect the negative battery cable..
3. Remove the following parts:
a. Inne ...
