Mazda 3 Service Manual: Brake Hose (Rear) Removal/Installation [Mzr 2.5, Mzr 2.3 Disi Turbo]
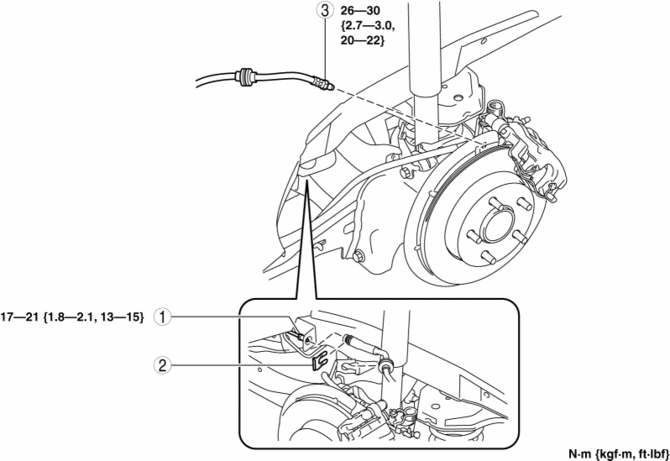
1. Remove in the order indicated in the table.
2. Install in the reverse order of removal.
3. Add brake fluid, bleed the brakes, and inspect for leakage after the installation has been completed..
|
1 |
Brake pipe (See Clip and Brake Pipe Installation Note.) |
|
2 |
Clip (See Clip and Brake Pipe Installation Note.) |
|
3 |
Brake hose |
Clip and Brake Pipe Installation Note
1. Install the brake hose to the vehicle-side bracket and secure it using a clip.
2. Verify that the brake hose is not twisted.
3. Tighten the brake pipe to the specified torque using a commercially available flare nut wrench.
 Brake Hose (Rear) Removal/Installation [Mzr 2.0, Skyactiv G 2.0]
CAUTION:
If the brake hose is installed to the caliper on the vehicle, the tool cannot
be installed correctly resulting in brake fluid leakage due to improper installation.
Therefore, re ...
 Brake Pedal Inspection
Pedal Height Inspection
1. Measure the distance from the center of the upper surface of the pedal pad
to the floor covering and verify that it is as specified.
If not within the specifi ...
Other materials:
Side Air Bag Sensor No. 2 Removal/Installation [Two Step Deployment Control
System]
WARNING:
Handling the side air bag sensor improperly can accidentally operate (deploy)
the air bag module, which may seriously injure you. Read the air bag system
service warnings and cautions before handling the side air bag sensor..
1. Switch the ignition to off.
2. Disconnec ...
Automatic Transaxle Fluid (ATF) Adjustment [Fw6 A EL]
CAUTION:
Only adjust the ATF level when the ATF temperature is 45—55 °C {113—131 °F}.
If the ATF level is incorrect, it could damage the transaxle.
Do not add ATF over the specification. Otherwise, the transaxle performance
could be reduced and ATF could leak.
1. Remove a ...
Restraints SST [Standard Deployment Control System]
49 H066 002
Deployment tool
49 D066 002
Adapter harness
49 L066 002
Adapter harness
49 B066 004
Adapter harness
49 N088 0A0
Fuel and Thermometer checker
...
