Mazda 3 Service Manual: Automatic Transaxle Fluid (ATF) Adjustment [Fw6 A EL]
CAUTION:
-
Only adjust the ATF level when the ATF temperature is 45—55 °C {113—131 °F}. If the ATF level is incorrect, it could damage the transaxle.
-
Do not add ATF over the specification. Otherwise, the transaxle performance could be reduced and ATF could leak.
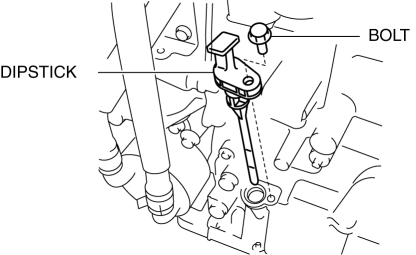
1. Remove aerodynamic undercover No.2..
2. Remove the dipstick securing bolt.
3. Remove the dipstick.
4. Adjust the ATF level.
a. Connect the M-MDS to the DLC-2 and display the PID TFT.
b. Warm up the engine until the ATF temperature is 50 °C {122 °F}
.
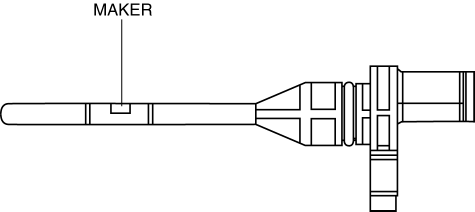
c. Remove the dipstick and wipe the ATF off using a rag while leaving the engine idling.
d. Insert the dipstick and pull it out again.
e. Verify that ATF is adhering to the central marker area on the dipstick.
-
If ATF is not adhering to the central marker area on the dipstick, adjust the ATF level to the central marker area.
NOTE:
-
The ATF color is blue.
-
Only use genuine ATF FZ for the FW6A-EL.
-
ATF type
-
Genuine ATF FZ
5. Insert the dipstick and remove the securing bolt.
-
Tightening torque
-
8—11 N·m {82—112 kgf·cm, 71—97 in·lbf}
6. Install aerodynamic undercover No.2..
 Automatic
...
 Automatic Transaxle Fluid (ATF) Inspection [FS5 A EL]
Automatic Transaxle Fluid (ATF) Condition Inspection
1. One way of determining whether the transaxle should be disassembled is by
noting:
If the ATF is muddy or varnished.
If the AT ...
Other materials:
Rear Door Module Panel Removal/Installation
1. Fully open the rear door glass.
2. Disconnect the negative battery cable..
3. Remove the following parts:
a. Rear door trim.
b. Rear door speaker.
c. Rear power window motor.
d. Rear door quarter glass.
e. Rear door glass.
4. Remove the clips securing the rear door wiring harness ...
PID/Data Monitor Inspection [Standard Deployment Control System]
1. Connect the M-MDS (IDS) to the DLC-2.
2. After the vehicle is identified, select the following items from the initialization
screen of the IDS.
a. Select “DataLogger”.
b. Select “Modules”.
c. Select “RCM”.
3. Select the applicable PID from the PID table.
4. Verify th ...
Oil Control Valve (OCV) Removal/Installation [Mzr 2.0, Mzr 2.5]
1. Remove the battery cover..
2. Disconnect the negative battery cable..
3. Remove the plug hole plate..
4. Disconnect the wiring harness.
5. Remove the ignition coils..
6. Remove the ventilation hose.
7. Remove the oil level gauge.
8. Remove the cylinder head cover..
9. Remove in th ...
