Mazda 3 Owners Manual: How to connect USB port/ Auxiliary jack
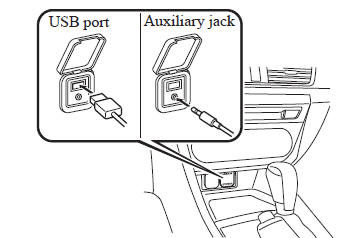
Type A (Without CD player)
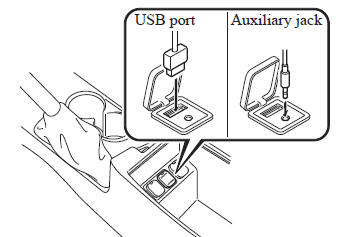
Type A (With CD player)
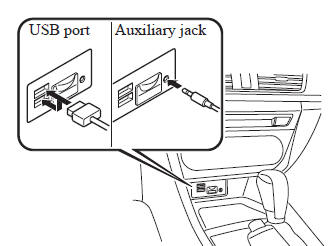
Type B (Without CD player)
Type B (With CD player)
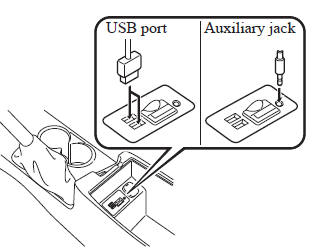
Connecting a device
- Open the console lid (with CD player).
- If there is a cover on the AUX jack or USB port, remove the cover.
- Connect the connector on the device to the USB port.
Connecting with a connector cable
- Open the console lid (with CD player).
- If there is a cover on the AUX jack or USB port, remove the cover.
- Connect the device plug/connector
cable to the auxiliary jack/USB port.
For vehicles with a CD player, pass the device plug/connector cable through the notch in the console and connect.
| WARNING Do not allow the connection plug cord to get tangled with the parking brake or the shift lever: Allowing the plug cord to become tangled with the parking brake or the shift lever is dangerous as it could interfere with driving, resulting in an accident. |
| CAUTION Do not place objects or apply force to the auxiliary jack/USB port with the plug connected. |
NOTE
- Insert the plug into the auxiliary jack/ USB port securely.
- Insert or pull out the plug with the plug perpendicular to the auxiliary jack/USB port hole.
- Insert or remove the plug by holding its base.
 AUX/USB/iPod mode
Audio can be heard from the vehicle's
speakers by connecting a commerciallyavailable
portable audio unit to the
auxiliary jack.
A commercially-available, non-impedance
(3.5 ) stereo mini plug c ...
 How to use AUX mode (Type A)
Switch the ignition to ACC or ON.
Press the power/volume dial to turn the
audio system on.
Press the media button ( )
of the
audio unit to change to the AUX mode.
NOTE
When th ...
Other materials:
Mazda Radar Cruise Control
(MRCC)
The Mazda Radar Cruise Control (MRCC) system is designed to maintain headway
control *1
according to the vehicle speed using a radar sensor (front) to detect the
distance to a vehicle
ahead, and by presetting the vehicle speed between 30 km/h (19 mph) and 145 km/h
(90
mph), the driver is fr ...
Side Turn Light Inspection
Side turn light illumination inspection
1. Disconnect the negative battery cable..
2. Remove the outer mirror glass..
3. Remove the outer mirror garnish..
4. Remove the side turn light..
5. Connect the battery voltage as shown in the figure.
If the side turn light does illuminat ...
Ignition Switch Removal/Installation [Without Advanced Keyless Entry And Push
Button Start System]
1. Disconnect the negative battery cable..
2. Remove the column cover..
3. Detach the tab.
4. Pull the pin in the direction of the arrow shown in the figure and release
the lock.
5. Disconnect the ignition switch connector and key interlock solenoid connector.
6. Remove the ...
