Mazda 3 Owners Manual: AUX/USB/iPod mode
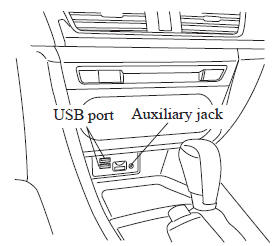
Audio can be heard from the vehicle's speakers by connecting a commerciallyavailable portable audio unit to the auxiliary jack.
A commercially-available, non-impedance (3.5 ) stereo mini plug cable is required.
Contact an Authorized Mazda Dealer for details.
In addition, audio can be played from the vehicle audio device by connecting a USB device or an iPod to the USB port.
NOTE (Type B) The SD card slot is for the navigation system. For vehicles with the navigation system, the SD card (Mazda genuine) with stored map data is inserted into the SD card slot and used.
Type A (Without CD player)
Type A (With CD player)
Type B (Without CD player)
Type B (With CD player)
- How to use AUX mode (Type A)
- How to use USB mode (Type A)
- How to use iPod mode (Type A)
- How to use AUX mode (Type B)
- How to use USB mode (Type B)
| WARNING Do not adjust the portable audio unit or a similar product while driving the vehicle: Adjusting the portable audio unit or a similar product while driving the vehicle is dangerous as it could distract your attention from the vehicle operation which could lead to a serious accident. Always adjust the portable audio unit or a similar product while the vehicle is stopped. |
CAUTION
|
NOTE
- This mode may not be usable depending on the portable audio device to be connected.
- Before using the auxiliary jack/USB port, refer to the instruction manual for the portable audio device.
- Use a commercially-available, nonimpedance (3.5 ) stereo mini plug for connecting the portable audio unit to the auxiliary jack. Before using the auxiliary jack, read the manufacturer's instructions for connecting a portable audio unit to the auxiliary jack.
- To prevent discharging of the battery, do not use the auxiliary input for long periods with the engine off or idling.
- When connecting a device to the auxiliary jack or USB port, noise may occur depending on the connected device. If the device is connected to the vehicle's accessory socket, the noise can be reduced by unplugging it from the accessory socket.
- How to connect USB port/ Auxiliary jack
- How to use AUX mode (Type A)
- How to use USB mode (Type A)
- How to use iPod mode (Type A)
- Error Indications (Type A)
- How to use AUX mode (Type B)
- How to use USB mode (Type B)
- Gracenote Database (Type B)
 Audio Control Switch Operation
Without Bluetooth ® Hands-Free
With Bluetooth ® Hands-Free
Adjusting the Volume
To increase the volume, press up the
volume switch ( +).
To decrease the volume, press down the
volume ...
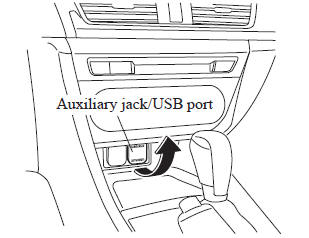
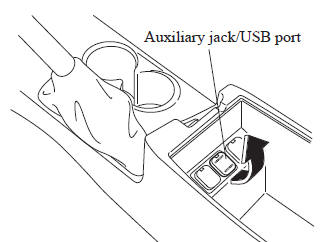
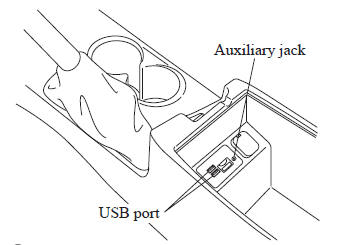
 How to connect USB port/ Auxiliary jack
Type A (Without CD player)
Type A (With CD player)
Type B (Without CD player)
Type B (With CD player)
Connecting a device
Open the console lid (with CD player).
If there is a ...
Other materials:
Vehicle Speed Sensor (VSS) Inspection [FS5 A EL]
On-Vehicle Inspection
1. Inspect the power supply circuit for the VSS.
a. Remove the insulator from the transaxle.
b. Disconnect the VSS connector.
c. Switch the ignition to ON (engine off).
d. Measure the voltage at VSS connector terminal A (harness-side).
If there is a ...
Rear Spoiler Removal/Installation
4SD
1. Remove the trunk lid trim..
2. Remove the nuts.
3. While cutting the double-sided adhesive tape using a flathead screwdriver
or a razor, separate the rear spoiler from the trunk lid.
WARNING:
Using a razor with bare hands can cause injury. Always wear gloves when usin ...
Electric Variable Valve Timing Motor/Driver Inspection [Skyactiv G 2.0]
WARNING:
A hot engine can cause severe burns. Turn off the engine and wait until it
is cool before servicing.
CAUTION:
Do not disassemble the electric variable valve timing motor/driver because
it is a precision unit.
1. Remove the battery cover..
2. Disconnect th ...
