
Mazda 3 Service Manual: Driver Side Air Bag Module Removal/Installation [Standard Deployment Control System]
WARNING:
-
Handling the air bag module improperly can accidentally deploy the air bag module, which may seriously injure you. Read the air bag system service warnings and cautions before handling the air bag module..
1. Switch the ignition to off.
2. Disconnect the negative battery cable and wait for 1 min or more
..
3. Remove the covers.
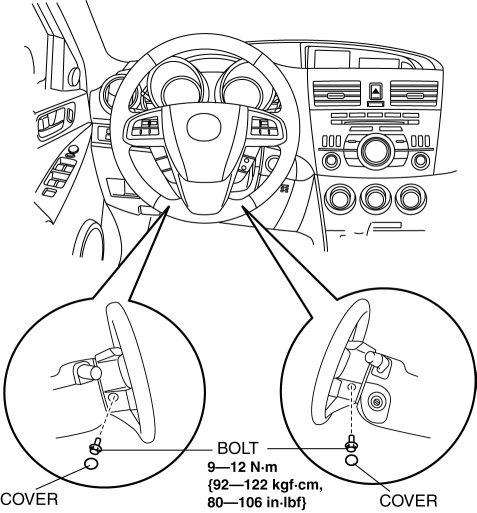
4. Remove the bolts.
5. Using a flathead screwdriver, lift the locking device carefully, however do not remove it.
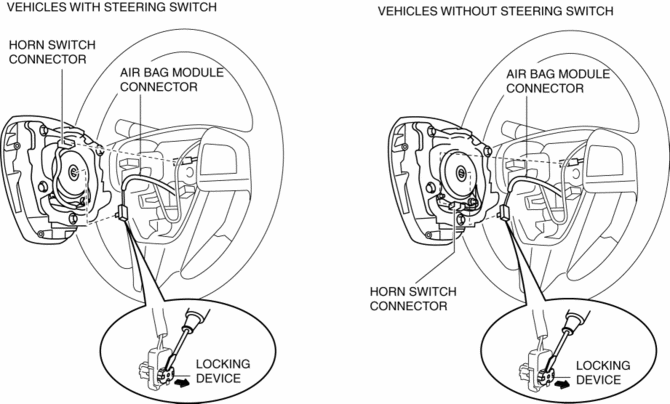
6. Disconnect the air bag module connector.
7. Disconnect the horn switch connector.
8. Remove the driver-side air bag module.
9. Install in the reverse order of removal.
10. Switch the ignition to ON.
11. Verify that the air bag system warning light illuminates for approx. 6 s
and goes out.
-
If the air bag system warning light does not operate normally, refer to the on-board diagnostic system (air bag system) and perform inspection of the system..
 Control System Personalization Features Setting Procedure
1. Connect the M-MDS to the DLC-2.
2. After the vehicle is identified, select the following items from the initial
screen of the M-MDS.
When using the IDS (laptop PC)
Sele ...
 Driver Side Air Bag Module Removal/Installation [Two Step Deployment Control
System]
Driver Side Air Bag Module Removal/Installation [Two Step Deployment Control
System]
WARNING:
Handling the air bag module improperly can accidentally deploy the air bag
module, which may seriously injure you. Read the air bag system service warnings
and cautions before h ...
Other materials:
Front Power Window Regulator Removal/Installation
1. To access the glass installation bolt, position the front door glass so that
the distance from the top of the front door glass to the upper part of the front
beltline molding is approx. 80 mm {3.1 in}.
2. Disconnect the negative battery cable..
3. Remove the following parts:
a. Inne ...
i-ACTIVSENSE
i-ACTIVSENSE is a collective term covering a series of advanced safety and
driver support
systems which make use of a Forward Sensing Camera (FSC) and radar sensors.
These
systems consist of active safety and pre-crash safety systems.
These systems are designed to assist the driver in safer ...
Antenna Feeder No.6 Inspection
1. Disconnect the negative battery cable..
2. Remove the following parts:
a. Upper panel.
b. Shift knob (MTX).
c. Selector lever knob (ATX).
d. Shift panel.
e. Side wall.
f. Console.
g. Car-navigation unit.
3. Verify that the continuity between antenna feeder No.6 terminals is as i ...
