Mazda 3 Service Manual: Driver Side Air Bag Module Removal/Installation [Two Step Deployment Control System]
WARNING:
-
Handling the air bag module improperly can accidentally deploy the air bag module, which may seriously injure you. Read the air bag system service warnings and cautions before handling the air bag module..
-
Due to the adoption of 2-step deployment control in the driver-side air bag module, depending on the impact force, it is possible that inflator No.2 might not deploy. In such cases, before disposing of the air bag module, make sure to follow the inflator deployment procedures and verify complete deployment of inflators No.1 and 2.
1. Switch the ignition to off.
2. Disconnect the negative battery cable and wait for 1 min or more
..
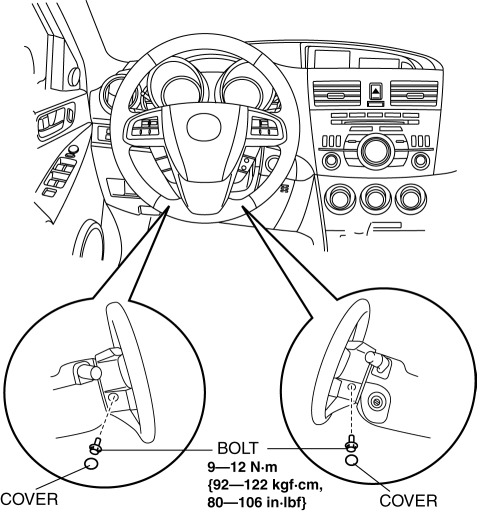
3. Remove the covers.

4. Remove the bolts.
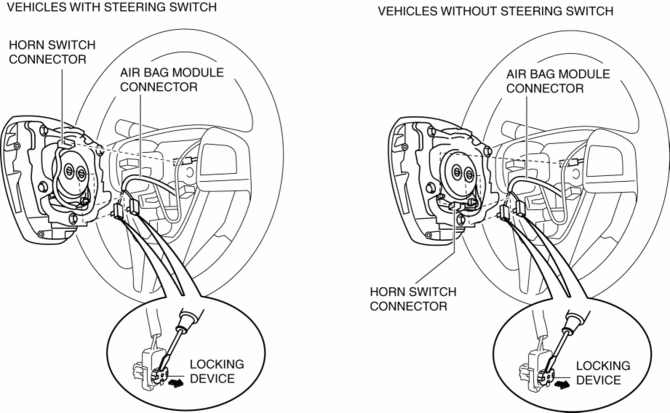
5. Using a flathead screwdriver, lift the locking device carefully, however do not remove it.

6. Disconnect the air bag module connector.
7. Disconnect the horn switch connector.
8. Remove the driver-side air bag module.
9. Install in the reverse order of removal.
10. Switch the ignition to ON.
11. Verify that the air bag system warning light illuminates for approx. 6 s
and goes out.
-
If the air bag system warning light does not operate normally, refer to the on-board diagnostic system (air bag system) and perform inspection of the system..
 Driver Side Air Bag Module Removal/Installation [Standard Deployment Control
System]
WARNING:
Handling the air bag module improperly can accidentally deploy the air bag
module, which may seriously injure you. Read the air bag system service warnings
and cautions before h ...
 Front Seat Belt Removal/Installation [Standard Deployment Control System]
WARNING:
Handling the front seat belt (pre-tensioner seat belt) improperly can accidentally
deploy the pre-tensioner seat belt, which may seriously injure you. Read the
air bag system se ...
Other materials:
Oil Seal (Control Valve Body) Replacement [Fw6 A EL]
1. Remove the battery cover..
2. Disconnect the negative battery cable..
3. Remove the air cleaner component..
4. Disconnect the control valve body connector.
5. Remove the hose clamp.
6. Cut the oil seal using a utility knife as shown in the following illustration.
CAUTION: ...
Hood Removal/Installation
WARNING:
Removing the hood without supporting it could cause the hood to fall and
cause serious injury. Always perform the procedure with at least another person
to prevent the hood from falling.
1. Disconnect the negative battery cable..
2. Remove the following parts:
a. Fro ...
Manual Transaxle Removal/Installation [C66 M R]
1. Remove the battery cover..
2. Disconnect the negative battery cable..
3. Remove the aerodynamic under cover No.2 and the splash shield as a single
unit..
4. Drain the manual transaxle oil..
5. Disconnect and/or remove the following parts in the engine compartment.
a. Remove the batte ...
