Mazda 3 Service Manual: Purge Solenoid Valve Removal/Installation [Mzr 2.0, Mzr 2.5]
1. Remove the battery cover..
2. Disconnect the negative battery cable..
3. Remove in the order indicated in the table.
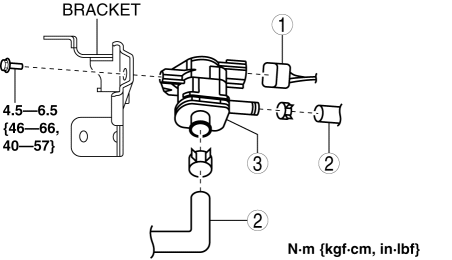
|
1 |
Purge solenoid valve connector |
|
2 |
Evaporative hose (See Evaporative Hose Installation Note.) |
|
3 |
Purge solenoid valve |
4. Install in the reverse order of removal.
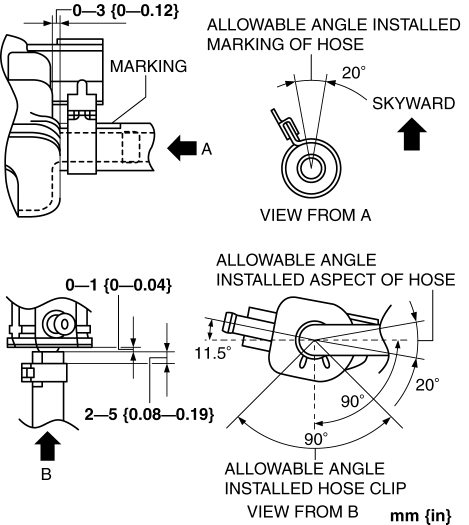
Evaporative Hose Installation Note
1. Install the evaporative hose and clip as shown in the figure.
 Purge Solenoid Valve Inspection [Mzr 2.0, Mzr 2.5]
Airflow Inspection
1. Remove the battery cover..
2. Disconnect the negative battery cable..
3. Remove the purge solenoid valve..
4. Inspect airflow between the ports under the following conditi ...
 Quick Release Connector (Emission System) Removal/Installation [Mzr 2.0, Mzr
2.5]
Quick Release Connector (Emission System) Removal/Installation [Mzr 2.0, Mzr
2.5]
Quick Release Connector Type
CAUTION:
Verify the type and location, and install/remove properly.
Except for Mexico
Mexico
Type A Removal
CAUTION:
Be careful not to da ...
Other materials:
Front Lower Arm Removal/Installation
CAUTION:
Performing the following procedures without first removing the ABS wheel-speed
sensor may possibly cause an open circuit in the wiring harness if it is pulled
by mistake. Before performing the following procedures, disconnect the ABS wheel-speed
sensor wiring harness connec ...
Cooling System Service Warnings [Mzr 2.0, Mzr 2.5]
WARNING:
Never remove the cooling system cap or loosen the radiator drain plug while
the engine is running, or when the engine and radiator are hot. Scalding engine
coolant and steam may shoot out and cause serious injury. It may also damage
the engine and cooling system.
Tu ...
Refrigerant Pressure Sensor Inspection [Manual Air Conditioner]
MZR 2.0, MZR 2.5
1. Install the manifold gauge.
2. Verify the high-pressure side reading of the manifold gauge.
3. Measure the terminal voltage of the climate control unit.
1G,1H and 2J
4. Verify that below graph as measure the terminal voltage 2J.
5. Follow the climate control ...
