Mazda 3 Service Manual: Front Lower Arm Removal/Installation
CAUTION:
-
Performing the following procedures without first removing the ABS wheel-speed sensor may possibly cause an open circuit in the wiring harness if it is pulled by mistake. Before performing the following procedures, disconnect the ABS wheel-speed sensor wiring harness connector (axle side) and fix the wiring harness to an appropriate place where it will not be pulled by mistake while servicing the vehicle.
1. Remove in the order indicated in the table.
2. Install in the reverse order of removal.
3. Inspect the wheel alignment and adjust it if necessary..

|
1 |
Front ABS wheel-speed sensor wiring harness connector |
|
2 |
Brake hose clip |
|
3 |
Front lower arm ball joint . |
|
4 |
Tie-rod end ball joint . |
|
5 |
Front lower arm . |
Front Lower Arm Removal Note (MZR 2.0 (RH))
NOTE:
-
When working on the right side of vehicles with MZR 2.0, move the A/C compressor protector so that the A/C compressor protector does not interfere with the removal of the front lower arm front side bolt.
1. Remove the A/C compressor protector.
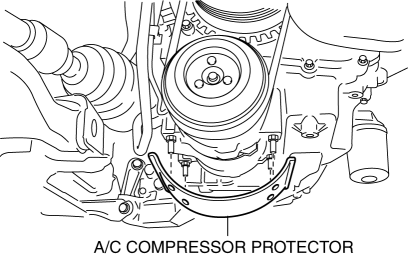
2. Remove the front lower arm.
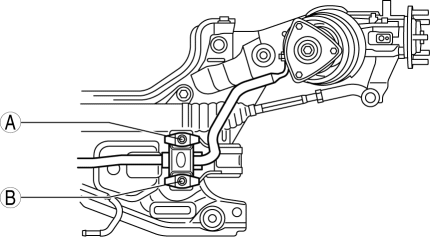
Front Lower Arm Installation Note (MZR 2.0 (RH))
1. Install the front lower arm to the front crossmember and temporarily tighten the installation bolts.
2. Completely tighten the bolts on the rear side of the front lower arm in the following order.
a. Temporarily tighten bolts A and B shown in the figure.
b. Tighten bolt A.
c. Tighten bolt B.
d. Tighten bolt A.
3. Install the A/C compressor protector.

Front Lower Arm Ball Joint Installation Note
NOTE:
-
The bolt insertion direction can be either front or rear of the vehicle, however, keep the insertion direction the same on both the left and right sides of the vehicle.
 Front Lower Arm Inspection
1. Remove the front lower arm from the vehicle..
2. Inspect the arm for bending or damage, and the ball joint for excessive looseness.
If there is any malfunction, replace the front lower a ...
 Front Shock Absorber And Coil Spring Disassembly/Assembly
WARNING:
Removing/installing the shock absorber and coil spring is dangerous. The
shock absorber and coil spring could fly off and cause serious injury or death,
and damage the vehicle.
...
Other materials:
Oil Cooler Flushing [FS5 A EL]
NOTE:
If the automatic transaxle is replaced, flush and inspect the oil cooler.
When replacing the automatic transaxle, inspect the oil cooler together with
flushing it using the following procedures, and with the oil cooler hose removed.
1. Disconnect the oil hose.
2. Set ...
Glove Compartment Removal/Installation
CAUTION:
If the glove compartment is closed without being joined to the stay damper,
the stay damper may be damaged. Verify that the stay damper is joined to the
glove compartment before closing the glove compartment.
1. Pull the stay damper in the direction (1) shown in the figu ...
Precaution [ABS]
1. Any one or a combination of the ABS warning and brake system warning lights
illuminates even when the system is normal.
Warning lights that may illuminate and/or flash
Cases in which the light may illuminate
Conditions in which the light will go ou ...
