Mazda 3 Owners Manual: Dashboard Illumination
When the position lights are turned on with the ignition switched ON, the brightness of the instrument panel illumination is dimmed.
NOTE When the position lights are turned on, the position lights indicator light in the instrument cluster turns on.
Refer to Headlights on .
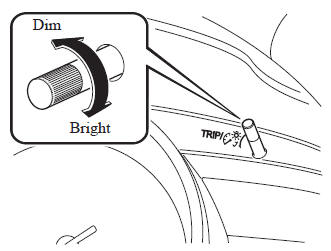
The brightness of the instrument panel and dashboard illuminations can be adjusted by rotating the knob.
- The brightness decreases by rotating the knob to the left. A beep sound will be heard when the knob has been rotated to the maximum dim position.
- The brightness increases by rotating the knob to the right.
Function for cancelling illumination dimmer
The illumination dimmer can be canceled by rotating the dashboard illumination knob to the right until a beep sound is heard while the instrument cluster is dimmed with the ignition switched ON.
If the instrument cluster's visibility is reduced due to glare from surrounding brightness, cancel the illumination dimmer.
NOTE
- When the illumination dimmer is canceled, the instrument cluster cannot be dimmed even if the position lights are turned on.
- When the illumination dimmer is canceled, the screen in the center display switches to constant display of the daytime screen.
 Fuel Gauge
The fuel gauge shows approximately
how much fuel is remaining in the tank
when the ignition is switched ON. We
recommend keeping the tank over 1/4 full.
Type A/Type B instrument cluster
Type ...
 Outside Temperature Display
When the ignition is switched ON, the
outside temperature is displayed.
NOTE
Under the following conditions, the
outside temperature display may differ
from the actual outside temperature
de ...
Other materials:
Clutch Pedal Position Switch Removal/Installation [C66 M R]
1. Remove the battery cover..
2. Disconnect the negative battery cable..
3. Disconnect the clutch pedal position switch connector.
4. Remove the clutch pedal position switch from the pedal bracket.
5. Insert a new clutch pedal position switch into the pedal bracket hole until
the switc ...
Trunk Lid Opener Switch Inspection
1. Disconnect the negative battery cable..
2. Remove the trunk lid trim..
3. Remove the high-mount brake light..
4. Remove the trunk lid opener switch..
5. Verify the continuity of trunk lid opener switch terminals A and B.
6. Verify that the continuity is as indicated in the table.
...
Head Restraints
Your vehicle is equipped with head
restraints on all outboard seats and the
rear center seat * . The head restraints
are intended to help protect you and the
passengers from neck injury.
WARNING
Always drive with the head restraints
installed when seats are being used and
make s ...
