Mazda 3 Owners Manual: Manual Transaxle Shift Pattern
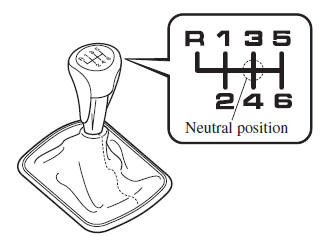
The shift pattern of the transaxle is conventional, as shown.
Depress the clutch pedal all the way down while shifting; then release it slowly.
Your vehicle is equipped with a device to prevent shifting to R (reverse) by mistake.
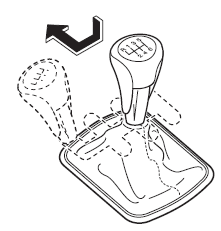
Push the shift lever downward and shift to R.
| WARNING
Do not use sudden engine braking on
slippery road surfaces or at high speeds:
Shifting down while driving on wet,
snowy, or frozen roads, or while driving
at high speeds causes sudden engine
braking, which is dangerous. The
sudden change in tire speed could
cause the tires to skid. This could
lead to loss of vehicle control and an
accident.
Always leave the shift lever in 1 or R position and set the parking brake when leaving the vehicle unattended: Otherwise the vehicle could move and cause an accident. |
CAUTION
|
NOTE
- (For vehicles with type C instrument cluster *1 )
- If the engine speed is about to exceed the permissible engine speed, the buzzer sounds.
- Refer to Over Rev. Buzzer on .
*1 To determine which instrument cluster is equipped on your Mazda, Refer to Meters and Gauges on .
- If shifting to R is difficult, shift back into neutral, release the clutch pedal, and try again.

 Gear Shift Indicator
The gear shift indicator supports you to
obtain optimum fuel economy and smooth
driving. It displays the selected gear
position in the instrument cluster as well
as notifies the driver to change t ...
Other materials:
Jacking Positions, Vehicle Lift (2 Supports) And Safety Stand (Rigid Rack) Positions
Jacking Positions
WARNING:
Improperly jacking a vehicle is dangerous. The vehicle can slip off the jack
and cause serious injury. Use only the correct front and rear jacking points
and block the wheels.
Use safety stands to support the vehicle after it has been lifted.
...
Accelerator Pedal Removal/Installation [Mzr 2.0, Mzr 2.5]
1. Remove the battery cover..
2. Disconnect the negative battery cable..
3. Remove the driver-side lower panel..
4. Remove in the order indicated in the table.
1
APP sensor connector
2
Accelerator pedal
5. Install in the rev ...
Engine Coolant Level Inspection [Mzr 2.0, Mzr 2.5]
WARNING:
Never remove the cooling system cap or loosen the radiator drain plug while
the engine is running, or when the engine and radiator are hot. Scalding engine
coolant and steam may shoot out and cause serious injury. It may also damage
the engine and cooling system.
Tu ...
