Mazda 3 Service Manual: Rear Beltline Molding Removal/Installation
1. Fully open the rear door glass.
2. Remove the rear door trim..
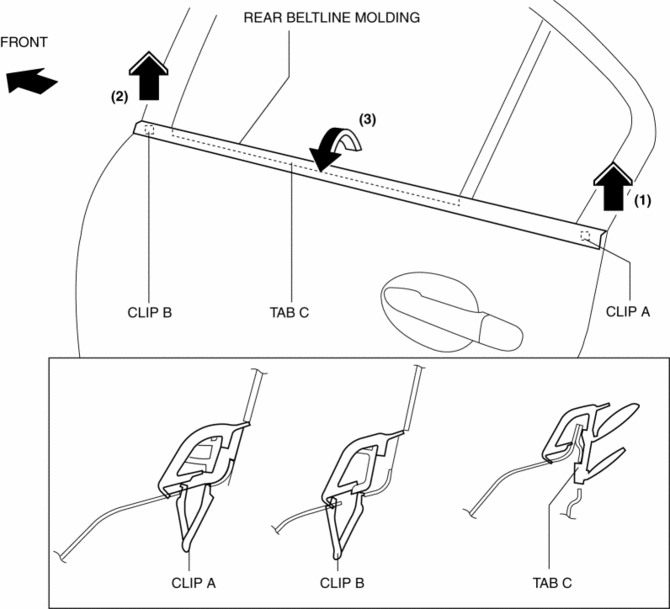
3. Remove clip A using a fastener remover and pull up the rear beltline molding in the direction of the arrow (1) shown in the figure.
4. Remove clip B using a fastener remover and pull up the rear beltline molding in the direction of the arrow (2) shown in the figure.
5. Rotate the rear beltline molding in the direction of the arrow (3) shown in the figure and remove it while detaching tabs C.
6. Install in the reverse order of removal.
 Front Mudguard Removal/Installation
1. Remove screw A, fasteners B, screws C, fasteners D, and E.
2. Remove the front mudguard in the direction of the arrow shown in the figure.
3. Install in the reverse order of removal. ...
 Rear Bumper Disassembly/Assembly
1. Remove the License plate lights..
2. Disassemble in the order indicated in the table.
1
Fastener A
2
Bracket
3
...
Other materials:
Combination Switch Disassembly/Assembly
CAUTION:
Handling the air bag module improperly can accidentally deploy the air bag
module, which may seriously injure you. Read the air bag system service warnings
and cautions before handling the air bag module..
1. Switch the ignition to off.
2. Disconnect the negative batte ...
Antenna Feeder No.3 Inspection
4SD (With Audio System (With Display))
1. Disconnect the negative battery cable..
2. Remove the rain sensor cover. (Vehicles with auto light/wiper system).
3. Disconnect the rain sensor connector. (Vehicles with auto light/wiper system)
4. Partially peel back the seaming welts.
5. Remove t ...
Transaxle Oil Replacement [G35 M R]
1. Park the vehicle on level ground.
2. Remove the aerodynamic under cover No.2..
3. Remove the drain plug and washer.
4. Drain the oil into a suitable container.
5. Install a new washer and the drain plug.
Tightening torque
39—59 N·m {4.0—6.0 kgf·m, 29—43 ft·lbf}
...
