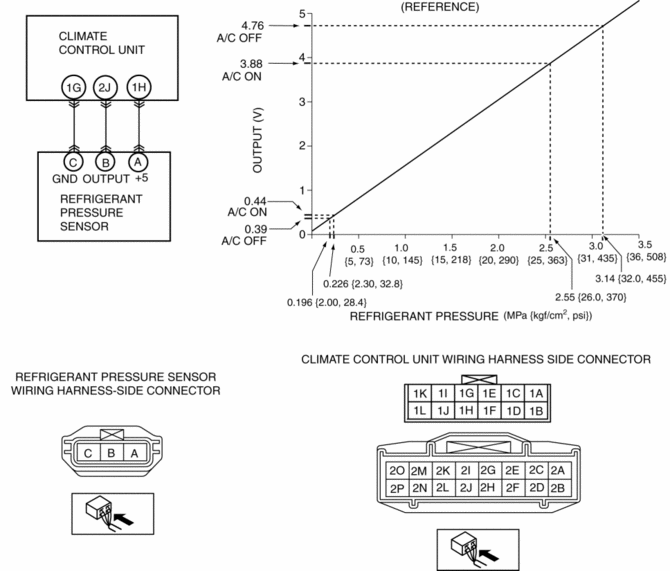
Mazda 3 Service Manual: Refrigerant Pressure Sensor Inspection [Manual Air Conditioner]
MZR 2.0, MZR 2.5
1. Install the manifold gauge.
2. Verify the high-pressure side reading of the manifold gauge.
3. Measure the terminal voltage of the climate control unit.
-
1G,1H and 2J
4. Verify that below graph as measure the terminal voltage 2J.
5. Follow the climate control unit inspection when measure the other terminal voltage..
-
Terminal 1G: 1.0 V or less
-
Terminal 1H: Approx. 5 V (Ignition switch on)
-
If the each voltage is not normal, inspect the related wiring harness.
-
If there is any malfunction, replace the related wiring harness.
-
If wiring harness is normal, replace the refrigerant pressure sensor.
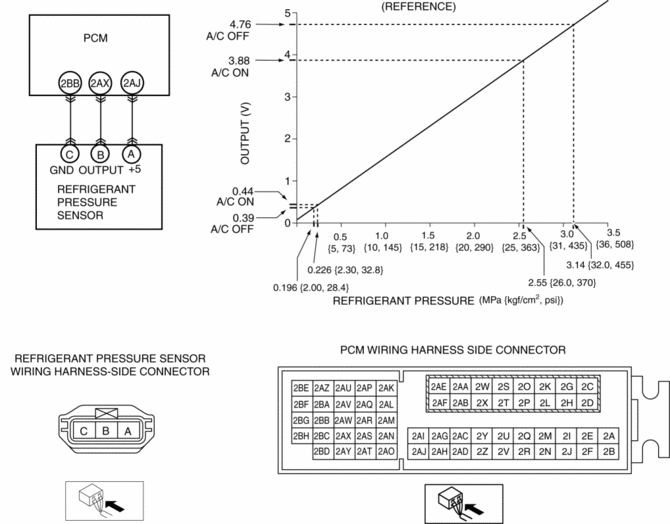
SKYACTIV-G 2.0
1. Install the manifold gauge.
2. Verify the high-pressure side reading of the manifold gauge.
3. Measure the terminal voltage of the PCM.
-
2BB, 2AX and 2AJ
4. Verify that below graph as measure the terminal voltage 2AX.
5. Follow the PCM inspection when measure the other terminal voltage..
-
Terminal 2BB: 1.0 V or less
-
Terminal 2AJ: Approx. 5 V (Ignition switch on)
-
If the each voltage is not normal, inspect the related wiring harness.
-
If there is any malfunction, replace the related wiring harness.
-
If wiring harness is normal, replace the refrigerant pressure sensor.
 Refrigerant Pressure Sensor Inspection [Full Auto Air Conditioner]
MZR 2.3 DISI Turbo, MZR 2.5
1. Install the manifold gauge.
2. Verify the high-pressure side reading of the manifold gauge.
3. Measure the terminal voltage of the climate control unit.
1C, ...
 Refrigerant Pressure Sensor Removal/Installation [Full Auto Air Conditioner]
1. Disconnect the negative battery cable..
2. Discharge the refrigerant..
3. Disconnect the refrigerant pressure sensor connector.
CAUTION:
If moisture or foreign material enters the ref ...
Other materials:
Auto Dimming Mirror Removal
1. Disconnect the negative battery cable.
2. Remove the screw.
3. Disconnect the auto-dimming mirror connector.
4. Pull out the rearview mirror toward the vehicle rear.
CAUTION:
When removing the rearview mirror, it may hit the headliner and cause damage.
Hold the ...
Body Control Module (Bcm) Configuration
1. Connect the M-MDS to DLC-2.
2. After the vehicle is identified, select the following items from the initial
screen of the M-MDS.
When using the IDS (laptop PC)
Select “Module Programming”.
Select “Programmable Module Installation”.
Select ...
Advanced Keyless Entry
WARNING
Radio waves from the key may aff ect
medical devices such as pacemakers:
Before using the key near people who
use medical devices, ask the medical
device manufacturer or your physician
if radio waves from the key will aff ect
the device.
The advanced keyless ...
