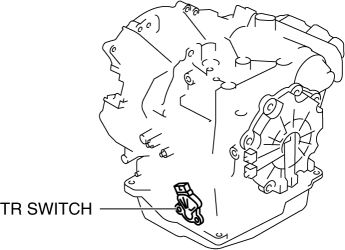
Mazda 3 Service Manual: Transaxle Range (TR) Switch Inspection [FS5 A EL]
CAUTION:
-
Water or foreign objects entering the connector can cause a poor connection or corrosion. Be sure not to drop water or foreign objects on the connector when disconnecting it.
Operation Inspection
1. Perform the following procedures to inspect the TR switch.
-
If there is any malfunction, adjust the TR switch..
a. Engage the parking brake and use wheel chocks at the front and rear of the wheels.
b. Verify that the starter operates only when the ignition is switched to START with the selector lever in the P position or the N position.
c. Verify that the back-up lights illuminate when shifted to the R position with the ignition at ON.
d. Verify that the positions of the selector lever and the selector indicator light are aligned.
On-Vehicle Inspection
1. Engage the parking brake and use wheel chocks at the front and rear of the wheels.
2. Perform the following procedures.
a. Remove the battery cover..
b. Disconnect the negative battery cable.
c. Remove the air cleaner component..
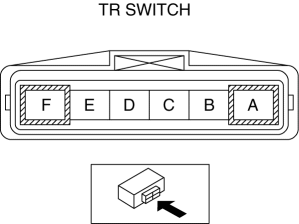
d. Disconnect the TR switch connector.
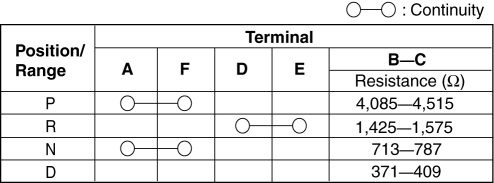
3. Inspect continuity as indicated in the table.
-
If there is any malfunction, adjust the TR switch..
 Transaxle Range (TR) Switch Adjustment [FS5 A EL]
CAUTION:
Water or foreign objects entering the connector can cause a poor connection
or corrosion. Be sure not to drop water or foreign objects on the connector
when disconnecting it.
...
 Transaxle Range (TR) Switch Removal/Installation [FS5 A EL]
CAUTION:
Water or foreign objects entering the connector can cause a poor connection
or corrosion. Be sure not to drop water or foreign objects on the connector
when disconnecting it.
...
Other materials:
Engine Coolant Temperature (ECT) Sensor Removal/Installation [Mzr 2.0, Mzr 2.5]
WARNING:
When the engine is hot, it can badly burn. Turn off the engine and wait until
it is cool before removing the ECT sensor.
ECT Sensor No.1
1. Remove the battery cover..
2. Disconnect the negative battery cable..
3. Drain the engine coolant..
4. Remove the battery and b ...
Entertainment System
Outline
Auxiliary jack/USB port has been adopted.
USB adapter has been adopted.
An audio unit which supports USB devices such as USB memory or iPods has
been adopted.
911 assist function has been added to the Bluetooth unit.
RDS-TMC (Radio Data System-Traffi ...
Receiving and Replying to
Messages (available only with
Email/SMS compatible phones)
SMS (Short Message Service) messages,
and E-mail received by connected devices
can be downloaded, displayed, and played
(read by the system).
Additionally, replies can also be made
to calls and messages in the received
messages.
Downloading messages
Up to 20 new messages can be
downloaded ...
