Mazda 3 Service Manual: Antenna Amplifier Removal/Installation
With Audio Unit (Without Display)
1. Disconnect the negative battery cable..
2. Remove the rain sensor cover. (Vehicles with auto light/wiper system).
3. Disconnect the rain sensor connector. (Vehicles with auto light/wiper system)
4. Partially peel back the seaming welts.
5. Remove the following parts:
a. Sunroof seaming welt (vehicles with sunroof)
b. A-pillar trim.
c. Front scuff plate.
d. Rear scuff plate.
e. B-pillar lower trim.
f. Upper anchor of the front seat belt.
g. B-pillar upper trim.
h. Rear seat cushion.
i. Tire house trim.
j. C-pillar trim.
k. Map light.
l. Sunvisor.
m. Assist handle.
n. Headliner.
6. Remove the clips A and B.
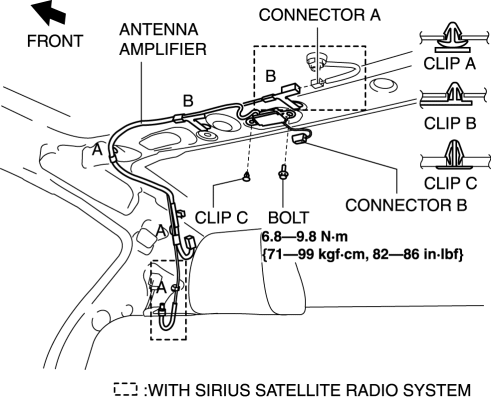
7. Disconnect the connector A. (with SIRIUS satellite radio system)
8. Disconnect the connector B..
9. Remove the clip C.
10. Remove the bolt.
11. Remove the antenna amplifier.
12. Install in the reverse order of removal.
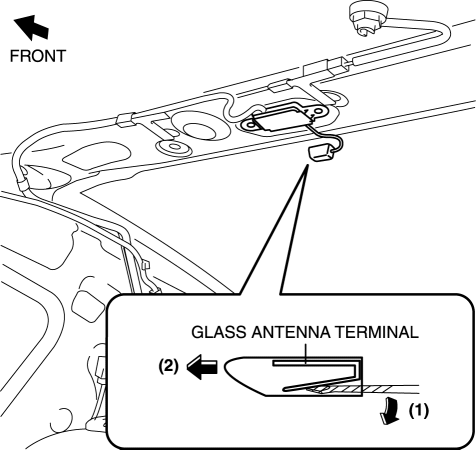
Connector B Removal Note
1. Remove the connector B in the direction of the arrow (2) shown in the figure while pressing the glass antenna terminal in the direction of the arrow (1).
With Audio Unit (With Display)
1. Disconnect the negative battery cable..
2. Remove the rain sensor cover. (Vehicles with auto light/wiper system).
3. Disconnect the rain sensor connector. (Vehicles with auto light/wiper system)
4. Partially peel back the seaming welts.
5. Remove the following parts:
a. Sunroof seaming welt (vehicles with sunroof)
b. A-pillar trim.
c. Front scuff plate.
d. Rear scuff plate.
e. B-pillar lower trim.
f. Upper anchor of the front seat belt.
g. B-pillar upper trim.
h. Rear seat cushion.
i. Tire house trim.
j. C-pillar trim.
k. Map light.
l. Sunvisor.
m. Assist handle.
n. Headliner.
6. Disconnect the connector A.
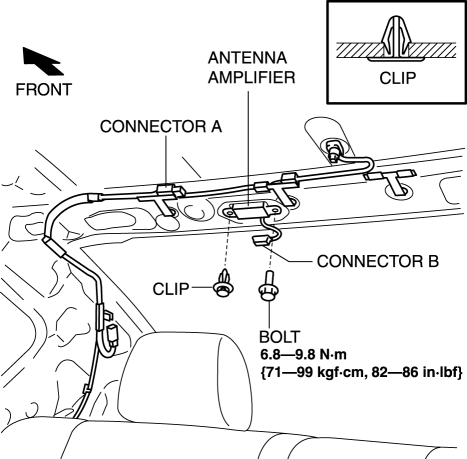
7. Disconnect the connector B..
8. Remove the clip.
9. Remove the bolt.
10. Remove the antenna amplifier.
11. Install in the reverse order of removal.
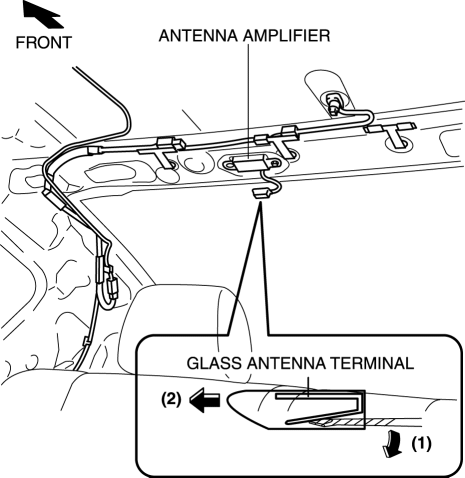
Connector B Removal Note
1. Remove the connector B in the direction of the arrow (2) shown in the figure while pressing the glass antenna terminal in the direction of the arrow (1).
 Antenna Amplifier Inspection
1. Disconnect the negative battery cable..
2. Remove the rain sensor cover. (Vehicles with auto light/wiper system).
3. Disconnect the rain sensor connector. (Vehicles with auto light/wiper system ...
 Antenna Feeder No.1 Inspection
1. Disconnect the negative battery cable..
2. Remove the following parts:
a. Center panel.
b. Audio unit.
c. A-pillar trim (RH).
3. Disconnect antenna feeder No.2.
4. Verify that the c ...
Other materials:
Air Filter Inspection [Mzr 2.0, Mzr 2.5]
Except for Mexico
Airflow inspection
1. Remove the air filter..
2. Blow from port A and verify that there is airflow from port B.
If there is no airflow, replace the air filter..
3. Blow from port B and verify that there is airflow from port A.
If there is no airflow, r ...
Front Door Removal/Installation
WARNING:
Removing the front door without supporting it could cause the front door
to fall and cause serious injury. Always perform the procedure with at least
another person to prevent the front door from falling.
1. Disconnect the negative battery cable..
2. Remove in the orde ...
Blower Motor Installation [Full Auto Air Conditioner]
1. Install the SST (49 B061 015A) to the blower motor.
2. Install the blower motor with the SST (49 B061 015A) installed, to
the A/C unit.
CAUTION:
To prevent damage to the sirocco fan, install the blower motor being careful
that the blower motor does not interfere with the ...
