Mazda 3 Service Manual: Power Steering Fluid Line Component Removal/Installation
NOTE:
-
The following procedure is for replacement of the parts shown in the figure. Regarding replacement of the suction hose and return hose, refer to the electric power steering oil pump component removal/installation..
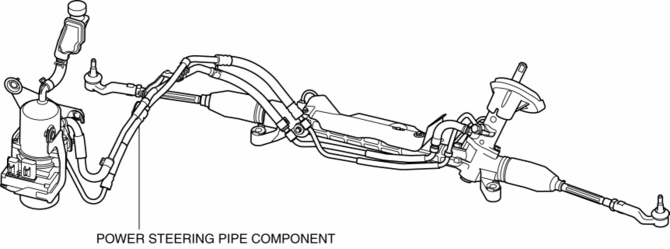
Power Steering Pipe Component Removal/Installation
NOTE:
-
The pressure pipe and return pipe are integrated with the power steering pipe component. Therefore, if any one of the pipes has a malfunction, replace the power steering pipe component.
1. Remove the front mudguard (RH)..
2. Remove the splash shield and aerodynamic under cover NO.2 as a single unit..
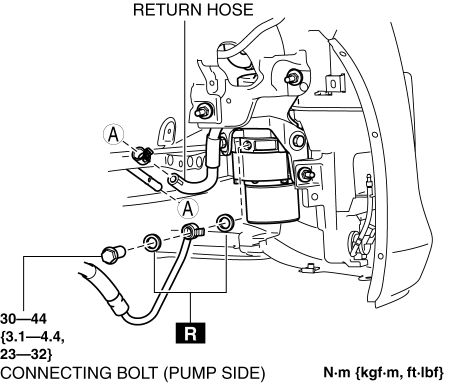
3. Remove the connecting bolt (pump side) from the electric power steering oil pump and disconnect the return hose from the power steering pipe component (return pipe).
NOTE:
-
Drain the power steering fluid.
4. Remove the nut shown in the figure.

5. Remove in the order indicated in the table.
6. Install in the reverse order of removal.
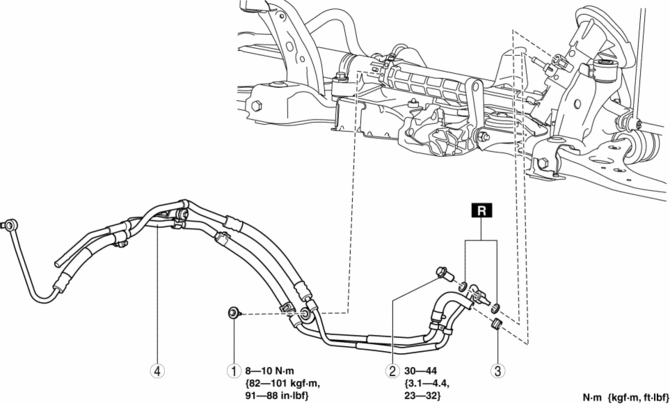
|
1 |
Bolt |
|
2 |
Connecting bolt (steering gear side) |
|
3 |
Hose clips |
|
4 |
Power steering pipe component |
 Power Steering Fluid Inspection
Fluid Level Inspection
1. Verify that the fluid level is between MAX and MIN of the sub tank when the
engine is cold.
If the fluid is not at the specified level, adjust the fluid level (MIN ...
 Steering Shaft Inspection
1. Inspect the column bearing for excessive play and damage.
2. Verify that the measurement of the steering shaft indicated in the figure
is as specified.
If not within the specificati ...
Other materials:
Passenger Side Air Bag Module Removal/Installation [Standard Deployment Control
System]
WARNING:
Handling the air bag module improperly can accidentally deploy the air bag
module, which may seriously injure you. Read the air bag system service warnings
and cautions before handling the air bag module..
NOTE:
When replacing the passenger-side air bag module af ...
Charging equipment
Charging equipment and names
AC charging inlet
Charging indicator and charging inlet light
DC charging inlet
Charging port lid
AC charging cable (if equipped)*
Charging port
*: For safe handling procedures and precautions related to the AC charging cable,
always refer to the ...
Rear Wiper Motor Inspection
1. Disconnect the negative battery cable..
2. Remove the following parts:
a. Rear wiper arm and blade.
b. Liftgate upper trim.
c. Liftgate side trim.
d. Liftgate lower trim.
3. Disconnect the rear wiper motor connector.
4. Apply battery positive voltage to rear wiper motor connector te ...
