Mazda 3 Service Manual: Front Shock Absorber And Coil Spring Removal/Installation
CAUTION:
-
Performing the following procedures without first removing the ABS wheel-speed sensor may possibly cause an open circuit in the wiring harness if it is pulled by mistake. Before performing the following procedures, disconnect the ABS wheel-speed sensor wiring harness connector (axle side) and fix the wiring harness to an appropriate place where it will not be pulled by mistake while servicing the vehicle.
1. Remove the windshield wiper arm and blade..
2. Remove the cowl grille..
3. Remove in the order indicated in the table.
4. Install in the reverse order of removal.
5. Inspect the wheel alignment..

|
1 |
Front ABS wheel-speed sensor wiring harness connector |
|
2 |
Brake hose clip |
|
3 |
Front stabilizer control link upper nut |
|
4 |
Tie-rod end ball joint . |
|
5 |
Stiffener |
|
6 |
Front shock absorber and coil spring (See Front Shock Absorber and Coil Spring Removal Note.) (See Front Shock Absorber and Coil Spring Installation Note.) |
Front Shock Absorber and Coil Spring Removal Note
1. Remove the front shock absorber lower bolt.
2. Tap the top of the steering knuckle with a hammer and release the shock absorber from the wheel hub and steering component.
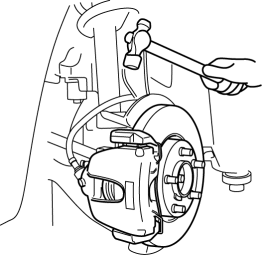
CAUTION:
-
When removing the steering knuckle by lightly tapping, the steering knuckle could fall and cause injury, or damage the part. When performing the removal, support the bottom of the steering knuckle with a jack.
3. Remove the front shock absorber upper bolt and remove the front shock absorber and coil spring from the vehicle.
Front Shock Absorber and Coil Spring Installation Note
1. Temporarily tighten the front shock absorber upper bolt.
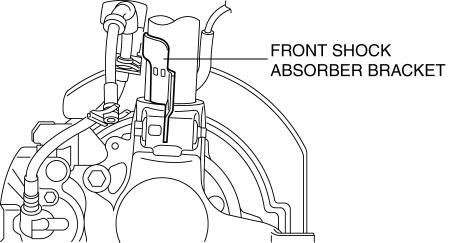
2. Align the steering knuckle notch with projection A on the lower side of the shock absorber.
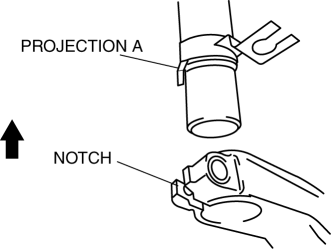
3. Press up the steering knuckle component using a jack until the steering knuckle contacts the lower end of the front shock absorber bracket, and tighten the shock absorber lower bolt.
4. Tighten the front shock absorber upper bolt.
 Front Shock Absorber And Coil Spring Disassembly/Assembly
WARNING:
Removing/installing the shock absorber and coil spring is dangerous. The
shock absorber and coil spring could fly off and cause serious injury or death,
and damage the vehicle.
...
 Front Shock Absorber Disposal
1. Place the front shock absorber on a level surface or with the piston pointing
downwards.
2. Drill a 2—3 mm {0.08—0.11 in} hole at the point A shown in the figure
so that the gas can escap ...
Other materials:
Drive Plate Removal/Installation [FS5 A EL]
1. Remove the transaxle..
2. Remove in the order indicated in the table.
1
Drive plate installation bolts
(See Drive Plate Installation Bolts Removal Note.)
(See Drive Plate Installation Bolts Installation Note.)
2
Backing plate
...
Outside Mirrors
WARNING
Be sure to look over your shoulder
before changing lanes:
Changing lanes without taking
into account the actual distance of
the vehicle in the convex mirror is
dangerous. You could have a serious
accident. What you see in the convex
mirror is closer than it app ...
Ignition Switch
Push Button Start Positions
The system operates only when the key is
within operational range.
Each time the push button start is pressed,
the ignition switches in the order of off,
ACC, and ON. Pressing the push button
start again from ON switches the ignition
off.
NOTE
The engine ...
