
Mazda 3 Service Manual: Oil Control Valve (OCV) Removal/Installation [Skyactiv G 2.0]
WARNING:
-
A hot engine can cause severe burns. Turn off the engine and wait until it is cool before servicing.
1. Remove the battery cover..
2. Disconnect the negative battery cable..
3. Remove the plug hole plate..
4. Remove the ignition coil/ion sensors..
5. Remove the cylinder head cover..
6. Remove in the order indicated in the table.
7. Install in the reverse order of removal.
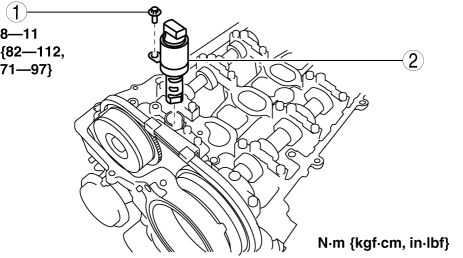
|
1 |
OCV installation bolt |
|
2 |
OCV |
 Oil Control Valve (OCV) Removal/Installation [Mzr 2.3 Disi Turbo]
1. Remove the battery cover..
2. Disconnect the negative battery cable..
3. Remove the charge air cooler..
4. Remove the ignition coils..
5. Disconnect the ventilation hose from the cylinder h ...
 Power Steering Fluid Inspection
Fluid Level Inspection
1. Verify that the fluid level is between MAX and MIN of the sub tank when the
engine is cold.
If the fluid is not at the specified level, adjust the fluid level (MIN ...
Other materials:
Tire Pressure Adjustment (With TPMS)
1. Use of a digital gauge is recommended for accurate measurement of the air
pressure.
2. Tire pressure lowers gradually as time passes. Due to this, monthly air pressure
inspection is recommended.
3. Perform tire pressure adjustment before driving. (When tires are cold.)
Tire press ...
Keyless Control Module Configuration
1. Connect the M-MDS (IDS) to DLC-2.
2. After the vehicle is identified, select the following items from the initialization
screen of the IDS.
Select “Module Programming”.
3. Then, select items from the screen menu in the following order.
Select “Programmable Modu ...
Back Up Light Switch Removal/Installation [G35 M R]
1. Remove the battery cover..
2. Disconnect the negative battery cable.
3. Remove the battery component. (ex: battery, battery tray and PCM component).
4. Remove the aerodynamic under cover No.2..
5. Drain the oil from the transaxle..
6. Disconnect the back-up light switch connector and r ...
