
Mazda 3 Service Manual: Rear Turn Light Bulb Removal/Installation
4SD
1. Disconnect the negative battery cable..
2. Remove the following parts:
a. Trunk mat.
b. Trunk board.
c. Trunk end trim.
3. Partially peel back the trunk side trim..
4. Remove in the order indicated in the table.
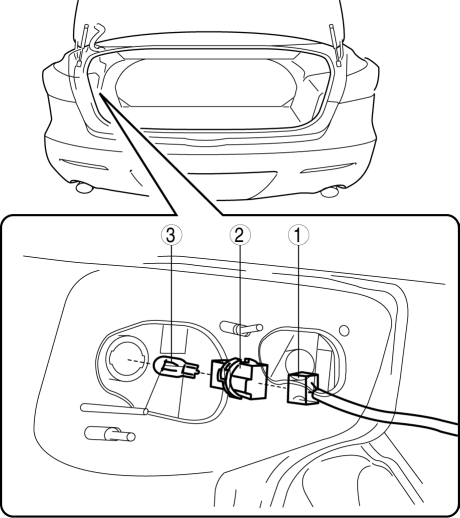
|
1 |
Connector |
|
2 |
Socket |
|
3 |
Rear turn light bulb |
5. Install in the reverse order of removal.
5HB
1. Disconnect the negative battery cable..
2. Remove the service hole cover.
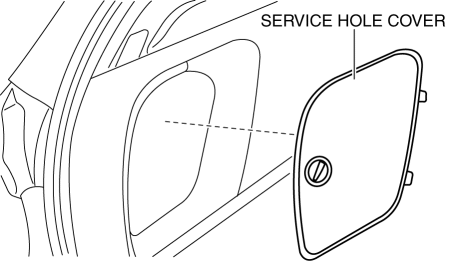
3. Remove in the order indicated in the table.
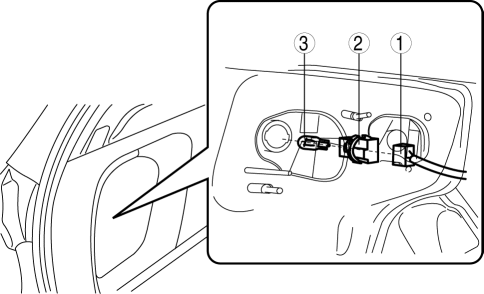
|
1 |
Connector |
|
2 |
Socket |
|
3 |
Rear turn light bulb |
4. Install in the reverse order of removal.
 Lighting System Personalization Features Setting Procedure
Auto Light System
1. Connect the M-MDS (IDS) to the DLC-2.
2. After the vehicle is identified, select the following items from the initial
screen of the IDS.
Select the “Module Pro ...
 Side Turn Light Inspection
Side turn light illumination inspection
1. Disconnect the negative battery cable..
2. Remove the outer mirror glass..
3. Remove the outer mirror garnish..
4. Remove the side turn light..
5. C ...
Other materials:
B Pillar Lower Trim Removal/Installation
1. Remove the front scuff plate..
2. Remove the rear scuff plate..
3. Partially peel back the seaming welt.
4. Pull the B-pillar lower trim in the direction of the arrow (1), (2) shown
in the figure, detach tab A, pin B, pin C, clip D.
5. Remove the B-pillar lower trim in the direction ...
Front Fog Light Removal/Installation
Except Mazdaspeed3
1. Disconnect the negative battery cable..
2. Remove the front bumper..
3. Pull the wiring harness from the hook in the direction of the arrow shown
in the figure and remove it.
4. Disconnect the connector.
5. Pull the wiring harness in the direction of the arrow (2 ...
Aluminum Wheel Maintenance
A protective coating is provided over the
aluminum wheels. Special care is needed
to protect this coating.
CAUTION
Do not use any detergent other than
mild detergent. Before using any
detergent, verify the ingredients.
Otherwise, the product could discolor
or stain the alumi ...
