Mazda 3 Service Manual: Adjuster Anchor Removal/Installation
WARNING:
-
The side air bag sensor is attached to the lower part of the B-pillar. When working around the B-pillar, disconnect the negative battery cable or work carefully, avoiding excessive impact to the lower part of the B-pillar.
1. Remove the following parts:
a. Front scuff plate.
b. Rear scuff plate.
c. B-pillar lower trim.
d. Front seat belt upper anchor installation bolt.
e. B-pillar upper trim.
2. Remove the bolt.
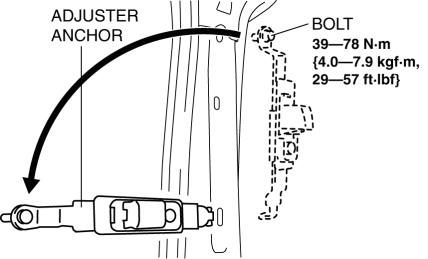
3. Remove the adjuster anchor.
4. Install in the reverse order of removal.
 Restraints SST [Two Step Deployment Control System]
49 H066 002
Deployment tool
49 D066 002
Adapter harness
49 L066 002
Adapter harness
...
 Air Bag Module And Pre Tensioner Seat Belt Deployment Procedures [Standard Deployment
Control System]
Air Bag Module And Pre Tensioner Seat Belt Deployment Procedures [Standard Deployment
Control System]
WARNING:
A live (undeployed) air bag module or pre-tensioner seat belt may accidentally
operate (deploy) when it is disposed of and cause serious injury. Do not dispose
of a live (unde ...
Other materials:
Parking brake
The parking brake system in the Subaru Solterra can be engaged or
released either automatically or manually, providing flexibility and enhanced convenience
depending on driving conditions.
When operating in automatic mode, the Subaru Solterra intelligently manages the
parking brake, activat ...
Vanity Mirror Illumination Inspection
1. Disconnect the negative battery cable..
2. Remove the sunvisor..
3. Verify that the continuity between the vanity mirror illumination terminals
is as indicated in the table.
If not as indicated in the table, inspect the bulb. If there is no malfunction,
replace the sunvisor.
...
Rearview Mirror Removal
1. Insert a tape-wrapped flathead screwdriver to the position shown in the figure
and press the center part of the spring in the direction of arrows (1), and then
pull out the rearview mirror in the direction of arrows (2) shown in the figure.
CAUTION:
When removing the rearview m ...
