Mazda 3 Service Manual: Transaxle Oil Replacement [G66 M R]
1. Park the vehicle on level ground.
2. Remove the aerodynamic under cover No.2..
3. Remove the drain plug and washer.
4. Drain the oil into a suitable container.
5. Install a new washer and the drain plug.
-
Tightening torque
-
39—59 N·m {4.0—6.0 kgf·m, 29—43 ft·lbf}
6. Remove the oil level plug and washer.
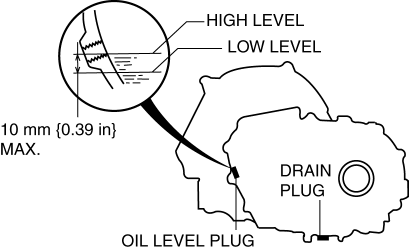
7. Add the specified amount and type of oil through the oil level plug hole until the level reaches the bottom of the oil level plug hole. Manual transaxle oil
|
Item |
Specification |
|
Grade |
API service GL-4 |
|
Viscosity |
SAE 75W-80 |
|
Capacity (approx. quantity) |
2.85 L {3.01 US qt, 2.51 lmp qt} |
8. Install a new washer and the oil level plug.
-
Tightening torque
-
39—59 N·m {4.0—6.0 kgf·m, 29—43 ft·lbf}
9. Install the aerodynamic under cover No.2..
 Transaxle Oil Replacement [G35 M R]
1. Park the vehicle on level ground.
2. Remove the aerodynamic under cover No.2..
3. Remove the drain plug and washer.
4. Drain the oil into a suitable container.
5. Install a new washer a ...
 Transaxle Range (TR) Switch Adjustment [FS5 A EL]
CAUTION:
Water or foreign objects entering the connector can cause a poor connection
or corrosion. Be sure not to drop water or foreign objects on the connector
when disconnecting it.
...
Other materials:
Operating Tips
Operate the climate control system with
the engine running.
To prevent the battery from being
discharged, do not leave the fan control
dial on for a long period of time with the
ignition switched ON when the engine is
not running.
Clear all obstructions such as leaves,
snow and ic ...
Front Door Speaker Removal/Installation
1. Disconnect the negative battery cable..
2. Remove the inner garnish..
3. Remove the front door trim..
4. Disconnect the connector.
Without Bose®
With Bose®
5. Remove the screw.
6. Remove the front door speaker in the direction of the arrow shown in the figure.
Without Bos ...
Steering Wheel And Column Inspection
Play Inspection
1. With the wheels in the straight-ahead position, start the engine.
2. Turn the steering wheel to the left and right gently, then verify that the
steering wheel play is within the specification.
Steering wheel play
0—30 mm {0—1.18 in} (When hydraulic operating)
...
