
Subaru Solterra 2023-2026 Owner's Manual: Fog light switch
In challenging weather conditions such as heavy rain, dense fog, or mist, the Subaru Solterra allows you to activate the front fog lights to significantly improve forward visibility and enhance overall driving safety.
Turning on the fog lights
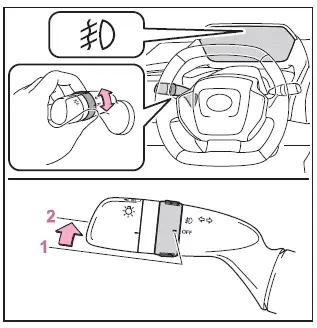
-
 *1
or
*1
or
 *2
Turns the front fog lights off
*2
Turns the front fog lights off -
 Activates the front fog lights to improve visibility in low-visibility conditions
*1:For the U.S.A.
*2:For Canada
■ Fog light can be used when
The fog lights on the Subaru Solterra can be used when the headlights are turned on, ensuring coordinated illumination for safer driving in poor weather.
NOTICE
■ To prevent 12-volt battery discharge
Avoid leaving the lights of the Subaru Solterra on longer than necessary when the EV system is not operating, as this may drain the 12-volt battery.
 AHB (Automatic High Beam)
The Automatic High Beam system in the Subaru Solterra utilizes a
forward-facing camera mounted near the upper windshield area to continuously monitor
surrounding light conditions. By analyzing hea ...
 Windshield wipers and washer
The Subaru Solterra windshield wiper system offers both automatic
rain-sensing operation and manual control, allowing precise adjustment for various
weather conditions. The washer system can also ...
Other materials:
Door Adjustment
1. Loosen the door hinge installation bolts.
2. Adjust the gap and height difference to the standard range by moving the door
back and forth, left and right.
Standard range
a: 2.5―4.5 mm {0.10―0.17 in}
b: -1.0―1.0 mm {-0.039―0.039 in}
c: 2.5& ...
Oil Pump Removal/Installation [Mzr 2.0, Mzr 2.5]
WARNING:
Hot engines and engine oil can cause severe burns. Turn off the engine and
wait until it and the engine oil have cooled.
A vehicle that is lifted but not securely supported on safety stands is dangerous.
It can slip or fall, causing death or serious injury. Never work ...
Judder Upon Torque Converter Clutch (TCC) Operation [Fw6 A EL]
TROUBLESHOOTING ITEM
Judder upon torque converter clutch (TCC) operation
DESCRIPTION
Vehicle jolts when TCC is engaged.
POSSIBLE CAUSE
Signal malfunction
APP ...
