
Subaru Solterra 2023-2026 Owner's Manual: AHB (Automatic High Beam)
The Automatic High Beam system in the Subaru Solterra utilizes a forward-facing camera mounted near the upper windshield area to continuously monitor surrounding light conditions. By analyzing headlights of oncoming vehicles, taillights ahead, street lighting, and ambient brightness, the Subaru Solterra intelligently switches between high beams and low beams to optimize visibility while minimizing glare for other road users.
WARNING
■ For safe use
Do not depend entirely on the Automatic High Beam system in the Subaru Solterra. Always remain attentive to road conditions and traffic, and manually adjust the headlights whenever necessary to ensure safe driving.
■ To prevent unintentional operation of the Automatic High Beam System
- Disable the system when its operation may not be appropriate for current driving conditions.
Using the Automatic High Beam System
1. Press the Automatic High Beam switch to activate the system in the Subaru Solterra.
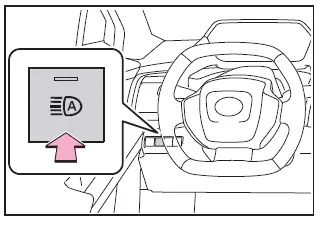
2. Set the headlight switch to the
 or
or
 position.
When the headlight lever is positioned for low beams, the Subaru Solterra AHB system becomes active and the AHB indicator will illuminate to confirm readiness.
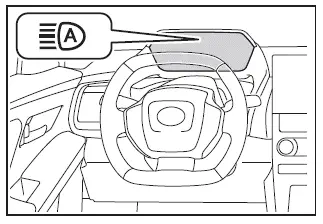
■ Automatic operating conditions of the high beams
- The Subaru Solterra will automatically activate high beams when all of the
following conditions are satisfied:
- Vehicle speed exceeds approximately 21 mph (34 km/h).
- The road ahead is sufficiently dark.
- No vehicles ahead are detected with active lighting.
- There is minimal influence from streetlights or other external illumination.
- The system will automatically switch to low beams under any of the following
conditions:
- Vehicle speed falls below approximately 17 mph (27 km/h).
- Ambient lighting increases.
- Vehicles ahead or oncoming traffic are detected.
- The road environment contains significant artificial lighting.
■ Front camera detection
- In certain real-world driving scenarios, the Subaru Solterra AHB system
may not immediately switch from high beams to low beams:
- When another vehicle suddenly merges or cuts in front.
- When vehicles cross the path of the Subaru Solterra.
- When road curvature, barriers, or vegetation intermittently obscure vehicles ahead.
- When vehicles are distant or approaching from adjacent lanes.
- When other vehicles lack sufficient lighting or have dim lights.
- When reflections from surfaces or the Subaru Solterra headlights affect detection.
- When sensor performance is compromised due to environmental conditions.
- The system may switch to low beams when detecting vehicles using fog lights even if their main headlights are off.
- External light sources such as buildings, traffic signals, or illuminated signage may influence headlight switching behavior in the Subaru Solterra.
- The timing of transitions between high and low beams may vary depending
on factors such as:
- Brightness and intensity of other vehicles’ lights
- Relative movement and direction of surrounding vehicles
- Distance between the Subaru Solterra and other road users
- Partial lighting visibility (e.g., one-sided lights)
- Presence of motorcycles or bicycles
- Road geometry, elevation, and surface conditions
- Vehicle load, including passengers and cargo
- Unexpected switching between high and low beams may occasionally occur.
- Smaller road users such as bicycles may not always be detected by the Subaru Solterra system.
- In some situations, the system may not accurately interpret ambient brightness:
This may cause the Subaru Solterra to keep low beams active or unintentionally switch high beams, potentially dazzling others. In such cases, manually control the headlights.
- Presence of lights similar to vehicle lighting in the environment
- Improperly functioning or dirty lights on other vehicles
- Frequent switching between beam modes
- Situations where high beams are unsuitable or distracting
- Driving in regions with opposite traffic direction standards
- Conditions requiring system deactivation
- Sensor obstruction or malfunction scenarios
■ Temporarily reducing front camera sensitivity
The Subaru Solterra allows temporary adjustment of front camera sensitivity to adapt to specific driving conditions.
1. Turn the power switch OFF while ensuring the following:
- The headlight switch is set to
 or
or
 .
. - The headlight lever is in the low beam position.
- The Automatic High Beam system is enabled.
2. Turn the power switch back to ON.
3. Within 60 seconds, move the headlight lever to high beam and back to its original position 10 times rapidly.
4. The Subaru Solterra AHB indicator will blink three times to confirm sensitivity adjustment.
Turning the high beams on/off manually
■ Changing to the high beams
Push the lever forward to manually activate high beams in the Subaru Solterra.
The AHB indicator will turn off, and the high beam indicator will illuminate.
Pull the lever back to return to automatic operation.
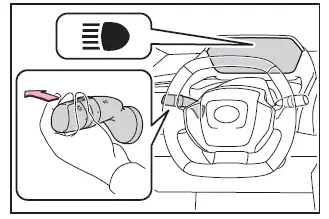
■ Changing to the low beams
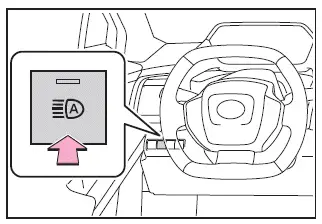
Press the Automatic High Beam switch to deactivate the system.
The AHB indicator will turn off, returning control to manual mode.
Press the switch again to reactivate automatic operation in the Subaru Solterra.
Temporarily changing to the low beams
When high beam usage is not appropriate, such as when approaching other vehicles or pedestrians, it is recommended to switch to low beams manually in the Subaru Solterra.
Pull the lever toward you and release it. The high beams will stay active only while the lever is held, and after release, the Subaru Solterra will temporarily maintain low beams before returning to automatic control.
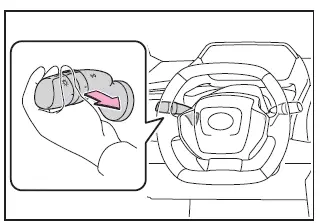
This intelligent AHB system in the Subaru Solterra enhances nighttime driving comfort and safety by balancing maximum illumination with consideration for other road users.
 Headlight switch
In the Subaru Solterra, the headlight system can be controlled either
manually or automatically, offering flexibility and intelligent adaptation to changing
driving conditions.
Turning on the hea ...
 Fog light switch
In challenging weather conditions such as heavy rain, dense fog,
or mist, the Subaru Solterra allows you to activate the front fog lights to significantly
improve forward visibility and enhance ov ...
Other materials:
Antenna Feeder No.3 Removal/Installation
4SD (With Audio Unit (With Display))
1. Disconnect the negative battery cable..
2. Remove the rain sensor cover. (Vehicles with auto light/wiper system).
3. Disconnect the rain sensor connector. (Vehicles with auto light/wiper system)
4. Partially peel back the seaming welts.
5. Remove the ...
Canister Vent (Cv) Solenoid Valve Inspection [Mzr 2.0, Mzr 2.5]
Except for Mexico
Airflow inspection
1. Remove the battery cover..
2. Disconnect the negative battery cable..
3. Remove the CV solenoid valve..
4. Inspect airflow between the ports under the following conditions.
Measured condition
Continuity between A ...
Outer Mirror Glass Installation
1. Connect the mirror heater connectors. (Vehicles with heated outer mirrors)
2. Connect the BSM indicator light connector. (Vehicles with BSM system)
3. Press part C on the outer mirror glass and install pin C.
4. Press part A on the outer mirror glass and install pins A.
5. Press part ...
