Mazda 3 Service Manual: Compression Inspection [Skyactiv G 2.0]
WARNING:
-
Hot engines and oil can cause severe burns. Be careful not to burn yourself during removal/installation of each component.
-
Fuel vapor is hazardous. It can very easily ignite, causing serious injury and damage. Always keep sparks and flames away from fuel.
-
Fuel line spills and leakage are dangerous. Fuel can ignite and cause serious injuries or death and damage. Fuel can also irritate skin and eyes. To prevent this, always complete the “Fuel Line Safety Procedure”..
1. Verify that the battery is fully charged..
-
Recharge it if necessary..
2. Warm up the engine to the normal operating temperature.
3. Perform “Fuel Line Safety Procedures”..
4. Remove the following parts.
a. Plug hole plate..
b. Ignition coil/ion sensors..
c. Spark plugs..
d. Fuel pump relay
e. Fuel injector relay
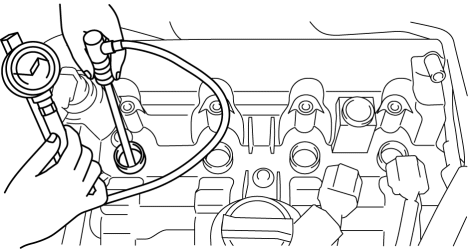
5. Measure the compression pressure using the following procedure.
a. Press a compression gauge into the spark plug hole.

b. Fully depress the accelerator pedal.
c. Crank the engine and measure the compression pressure.
-
Compression
-
Standard: 827 kPa {8.43 kgf/cm2, 120 psi} [300 rpm]
-
Minimum: 661 kPa {6.74 kgf/cm2, 95.9 psi} [300 rpm]
-
Maximum difference between cylinders: 140 kPa {1.43 kgf/cm2, 20.3 psi}
NOTE:
-
Because the SKYACTIV-G 2.0 retards the intake valve closing timing, compression pressure is low.
d. Perform Steps (1) to (3) for all cylinders.
e. If the measured value is less than the minimum value, or there is a cylinder whose compression value varies from that of other cylinders by 140 kPa {1.43 kgf/cm2, 20.3 psi}
or more, add a small amount of engine oil through the spark plug hole. Then measure the compression pressure and perform the respective operations for the following cases.
-
If the pressure increases by adding the engine oil, the piston ring or the cylinder surface is worn, or they are damaged. Perform overhaul servicing.
-
If the pressure does not increase, valve seizure, valve attachment malfunction, or pressure leakage from the cylinder head gasket might be occurring. Perform overhaul servicing.
f. If the measured value is high, it is possible that there is an error in the electric variable valve timing system.
6. Remove the compression gauge.
7. Install the following parts.
a. Fuel injector relay
b. Fuel pump relay
c. Spark plugs..
d. Ignition coil/ion sensors..
e. Plug hole plate..
 Compression Inspection [Mzr 2.3 Disi Turbo]
WARNING:
Hot engines and oil can cause severe burns. Be careful not to burn yourself
during removal/installation of each component.
Fuel vapor is hazardous. It can very easily ignit ...
 Electric Variable Valve Timing Actuator Inspection [Skyactiv G 2.0]
WARNING:
A hot engine can cause severe burns. Turn off the engine and wait until it
is cool before servicing.
CAUTION:
Do not disassemble the electric variable valve timing ac ...
Other materials:
Air Mix Actuator Inspection [Full Auto Air Conditioner]
CAUTION:
If the lever position exceeds the operation range shown in the figure, the
circuit in the actuator could be damaged. Always perform an actuator operation
inspection with the lever movement within the range shown in the figure.
Driver-side
1. Connect battery positive vol ...
BSM OFF Switch
When the BSM OFF switch is pressed, the
Blind Spot Monitoring (BSM) and Rear
Cross Traffic Alert (RCTA) systems are
turned off and the BSM OFF Indicator
Light in the instrument cluster turns on.
If the switch is pressed again, the Blind
Spot Monitoring (BSM) and Rear Cross
Traffic Alert ...
Operating the Compact Disc (CD) Player
NOTE
If a disc has both music data (CD-DA)
and MP3/WMA/AAC files, playback of the
two or three file types differs depending on
how the disc was recorded.
Inserting the CD
Insert the CD into the slot, label-side up.
The auto-loading mechanism will set the
CD and begin play.
NOTE
T ...
