Mazda 3 Service Manual: Base Installation
1. Cut away all of the original sealant using a razor.
WARNING:
-
Using a razor with bare hands can cause injury. Always wear gloves when using a razor.
2. Clean and degrease the ceramic coating on the glass and the base.
CAUTION:
-
Keep the area free of dirt and grease, and do not touch the surface. Otherwise, the primer may not properly bond to the surface of the glass.
3. Apply primer to the bonding area of the glass and the base.
4. Use only glass primer on the glass, and body primer on the base. Allow the primer to dry for approx. 30 min.
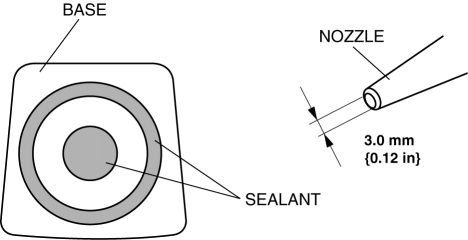
5. Apply 3.0 mm {0.12 in}
layer of sealant to the base.
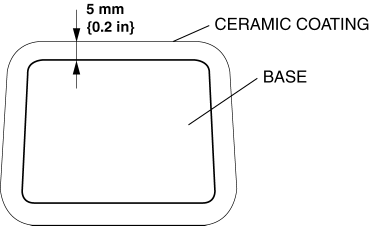
6. Center the base in the ceramic coating and press it onto the glass.
7. Use isopropyl alcohol to remove any excess repair sealant. Hardening time of sealant
|
Temperature |
Surface hardening time |
Time required until car can be put into service |
|
5 °C {41 °F} |
Approx. 1.5 h |
Approx. 12 h |
|
20 °C {68 °F} |
Approx. 1 h |
Approx. 4 h |
|
35 °C {95 °F} |
Approx. 10 min |
Approx. 2 h |
8. Install the rearview mirror.
9. Connect the negative battery cable..
 Auto Dimming Mirror Removal
1. Disconnect the negative battery cable.
2. Remove the screw.
3. Disconnect the auto-dimming mirror connector.
4. Pull out the rearview mirror toward the vehicle rear.
CAUTION:
...
 Base Removal
1. Remove the rearview mirror..
2. Wind each end of a wire around a bar.
WARNING:
Using the piano wire with bare hands can cause injury. Always wear gloves
when using the piano wire ...
Other materials:
Transaxle Oil Replacement [G35 M R]
1. Park the vehicle on level ground.
2. Remove the aerodynamic under cover No.2..
3. Remove the drain plug and washer.
4. Drain the oil into a suitable container.
5. Install a new washer and the drain plug.
Tightening torque
39—59 N·m {4.0—6.0 kgf·m, 29—43 ft·lbf}
...
Shift Lock System Inspection
Shift-Lock System Inspection
1. Switch the ignition to ON.
2. Shift the selector lever to the P position.
3. Perform the following procedures to inspect the shift-lock system.
If there is any malfunction, inspect the shift-lock solenoid and P position
switch..
a. Verify that th ...
Climate Control Unit Removal/Installation [Full Auto Air Conditioner]
1. Disconnect the negative battery cable..
2. Remove the following parts:
a. Upper panel.
b. Shift lever knob (MTX).
c. Selector lever knob (ATX).
d. Shift panel.
e. Side wall.
f. Console.
g. Center panel.
h. Audio unit.
3. Remove in the order indicated in the table.
...
