Mazda 3 Service Manual: Steering Shaft Inspection
1. Inspect the column bearing for excessive play and damage.
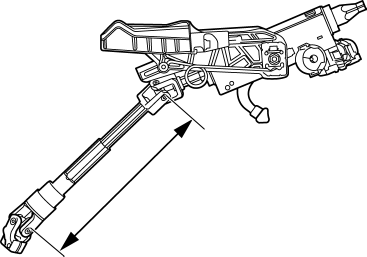
2. Verify that the measurement of the steering shaft indicated in the figure is as specified.
-
If not within the specification replace the steering shaft component.
-
Steering shaft length
-
315—320 mm {12.41—12.59 in}
3. Inspect the tilt/telescope mechanism operation for the following.
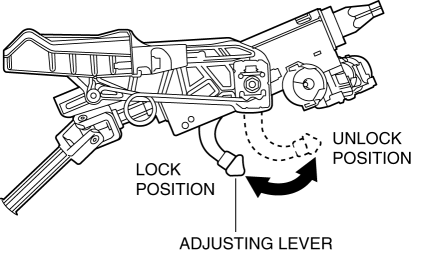
a. Verify that the adjusting lever moves smoothly from the lock to the unlock position.
b. Verify that the steering shaft is fixed firmly when the adjusting lever is locked.
-
If there is any malfunction, replace the steering shaft.
 Power Steering Fluid Line Component Removal/Installation
NOTE:
The following procedure is for replacement of the parts shown in the figure.
Regarding replacement of the suction hose and return hose, refer to the electric
power steering oil pum ...
 Steering Gear And Linkage Assembly
CAUTION:
To prevent damage to the steering gear, secure it to the vise using a copper
plate or clean cloth.
1. Assemble in the order indicated in the table.
1
...
Other materials:
Washer Fluid Level Sensor Inspection
1. Disconnect the negative battery cable..
2. Remove the front bumper..
3. Verify that continuity between the washer fluid-level sensor terminals is
as indicated in the table.
If not as specified, replace the washer fluid-level sensor.
...
Antilock Brake System (ABS)
The ABS control unit continuously
monitors the speed of each wheel. If
one wheel is about to lock up, the ABS
responds by automatically releasing and
reapplying that wheel's brake.
The driver will feel a slight vibration in
the brake pedal and may hear a chattering
noise from the brake syst ...
Combination Switch Removal/Installation
CAUTION:
Handling the air bag module improperly can accidentally deploy the air bag
module, which may seriously injure you. Read the air bag system service warnings
and cautions before handling the air bag module..
1. Switch the ignition to off.
2. Disconnect the negative batte ...
