Mazda 3 Service Manual: Indirect Illumination Removal/Installation
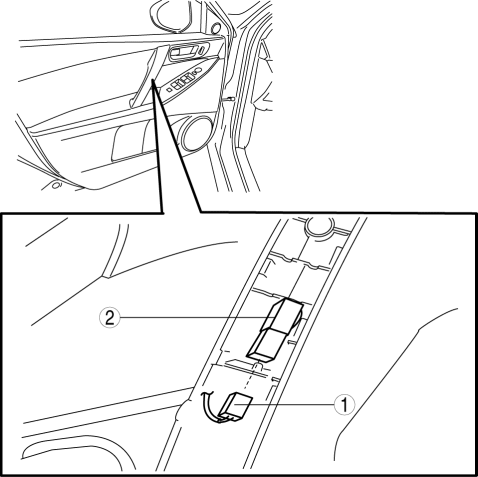
Power Window Switch (With power window switch indirect illumination)
1. Disconnect the negative battery cable..
2. Remove the assist handle cover..
3. Remove in the order indicated in the table.
|
1 |
Connector |
|
2 |
Power window switch indirect illumination |
4. Install in the reverse order of removal.
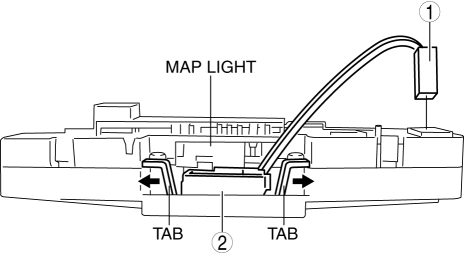
Console
1. Disconnect the negative battery cable..
2. Remove the map light..
3. Remove in the order indicated in the table.
|
1 |
Connector |
|
2 |
Console indirect illumination |
4. Install in the reverse order of removal.
 Inboard Light Removal/Installation
4SD
1. Disconnect the negative battery cable..
2. Remove the trunk lid trim..
3. Disconnect the connector.
4. Remove the nut.
5. Remove the bracket.
6. Remove the inboard light as shown ...
 Lighting System Personalization Features Setting Procedure
Auto Light System
1. Connect the M-MDS (IDS) to the DLC-2.
2. After the vehicle is identified, select the following items from the initial
screen of the IDS.
Select the “Module Pro ...
Other materials:
Operating the Radio
Radio ON
Press a band selector button ( )
to
turn the radio on.
Band selection
Successively pressing the band selector
button ( ) switches the bands as
follows: FM1→FM2→AM.
The selected mode will be indicated.
NOTE
If the FM broadcast signal becomes weak,
reception auto ...
Child restraint system fixed with a seat belt
In the Subaru Solterra, a child restraint system for infants or small children
must be properly secured using the lap portion of the lap/shoulder seat belt. Correct
installation is essential to ensure that the system provides effective protection
in all driving conditions.
■ Installing chil ...
Pre Delivery Inspection
Pre-Delivery Inspection Table
Exterior
INSPECT and ADJUST, if necessary, the following items to specification:
□ Glass, exterior bright metal and paint for damage
□ Wheel lug nuts
□ All weatherstrips for damage or detachment
□ Tire pressures
□ Headlight c ...
