Mazda 3 Owners Manual: Information on Temporary Tires
Please refer to the sample below
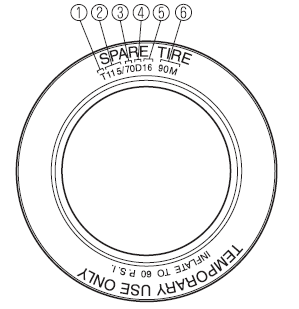
- Temporary tires
- Nominal width of tire in millimeters
- Ratio of height to width (aspect ratio)
- Diagonal
- Rim diameter code
- Load index & speed symbol
T115/70D16 90M is an example of a tire size and load index rating. Here is an explanation of the various components of that tire size and load index rating. Note that the tire size and load index rating may be different from the example.
T
Indicates a tire that may be installed on cars, SUVs, minivans and light trucks as designated by the Tire and Rim Association (T&RA).
115
“115” is the nominal width of the tire in millimeters. This three-digit number gives the width in millimeters of the tire from sidewall edge to sidewall edge. In general, the larger the number, the wider the tire.
70
“70” is the aspect ratio. This two-digit number indicates the tire's ratio of height to width.
D
“D” is the tire construction symbol. D indicates “diagonal ply construction”.
16
“16” is the wheel rim diameter in inches.
90
“90” is the Load Index. This two-or three-digit number indicates how much weight each tire can support.
M
“M” is the speed rating. The speed rating denotes the maximum speed for which the use of the tire is rated.

 Information on Passenger Vehicle Tires
Please refer to the sample below.
TIN: U.S. DOT tire identification number
Passenger car tire
Nominal width of tire in millimeters
Ratio of height to width (aspect ratio)
Radial
Run- ...
 Location of the Tire Label
(Placard)
Location of the Tire Label
(Placard)
You will find the tire label containing tire inflation pressure by tire size
and other important
information on the driver's side B-pillar or on the edge of the driver's door
frame.
SAMPLE
...
Other materials:
Types of cameras and sensors used for the Advanced Park
The Subaru Solterra Advanced Park system relies on a network of high-precision
cameras and sensors designed to detect surrounding vehicles and environmental features,
helping the driver accurately identify suitable parking spaces and improve overall
parking efficiency.
Front camera
Sid ...
Electronic key battery
If the electronic key battery of your Subaru Solterra becomes depleted,
it should be replaced promptly to ensure uninterrupted operation of all key functions.
■ If the key battery is depleted
When the battery inside the Subaru Solterra electronic key weakens or fully discharges,
you may noti ...
Operating the Driver's Power
Window
Normal opening/closing
To open the window to the desired
position, lightly hold down the switch.
To close the window to the desired
position, lightly pull up the switch.
Auto-opening/closing
To fully open the window automatically,
press the switch completely down, then
release. The win ...
