Mazda 3 Service Manual: General Procedures (Brake)
Wheel and Tire Installation
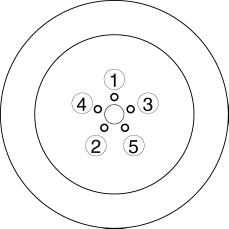
1. When installing the wheels and tires, tighten the wheel nuts in a criss-cross pattern to the following tightening torque.

-
Tightening torque
-
88—118 N·m {9.0—12 Kgf·m, 65—87 ft·lbf}
Brake Lines Disconnection
1. If any brake line has been disconnected during the procedures, add brake fluid, bleed the brakes, and inspect for leakage after the procedure has been completed.
CAUTION:
-
Brake fluid will damage painted surfaces. Be careful not to spill any on painted surfaces. If it is spilled, wipe it off immediately.
Brake Pipe Flare Nut Tightening
1. Tighten the brake pipe flare nut using the commercially available flare nut wrench.
Connector Disconnection
1. Disconnect the negative battery cable before performing any work that requires handling of connectors..
ABS/DSC Related Parts
1. Make sure that there are no DTCs in the ABS/DSC memory after working on ABS/DSC related parts. If there are any DTCs in the memory, clear them.
DSC Related Parts Sensor Initialization Procedure
WARNING:
-
If the initialization procedure is not completed, the DSC will not operate properly and it might cause an unexpected accident. Therefore, when replacing or removing the following parts, make sure to perform the initialization procedure to ensure proper DSC operation.
1. When replacing or removing the following parts, perform the initialization procedure..
-
DSC HU/CM
 Disc Pad (Rear) Replacement
1. Remove in the order indicated in the table.
2. Install in the reverse order of removal.
3. After installation, pump the brake pedal a few times and inspect the following:
Parking brake ...
 Master Cylinder Removal/Installation [Mzr 2.0, Skyactiv G 2.0, Mzr 2.5]
1. Remove the battery and battery tray..
2. Remove in the order indicated in the table.
3. Install in the reverse order of removal.
1
Brake fluid level sensor connect ...
Other materials:
A/C Unit Disassembly/Assembly
1. Disassemble in the order indicated in the table.
CAUTION:
If a non-specified grease is used, it may result in abnormal noise or improper
operation of the links. Apply only the specified grease to each link.
2. Assemble in the reverse order of disassembly.
X: Applicable—: ...
Outside the United States/
Canada
Government regulations in the United States/Canada require that automobiles
meet specific
emission regulations and safety standards. Therefore, vehicles built for use in
the United
States/Canada may differ from those sold in other countries.
The differences may make it difficult or even imp ...
Bright-Metal Maintenance
Use tar remover to remove road tar and
insects. Never do this with a knife or
similar tool.
To prevent corrosion on brightmetal
surfaces, apply wax or chrome
preservative and rub it to a high luster.
During cold weather or in coastal areas,
cover bright-metal parts with a coating
...
