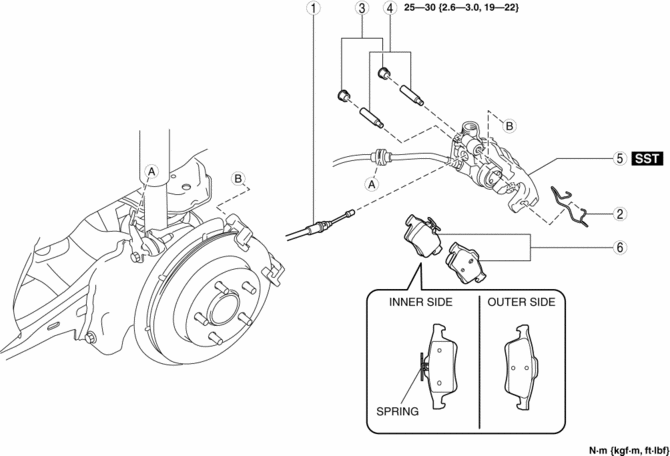
Mazda 3 Service Manual: Disc Pad (Rear) Replacement
1. Remove in the order indicated in the table.
2. Install in the reverse order of removal.
3. After installation, pump the brake pedal a few times and inspect the following:
-
Parking brake lever stroke
-
Brake drag
|
1 |
Parking brake cable (See PARKING BRAKE LEVER REMOVAL/INSTALLATION.) |
|
2 |
Retaining clip (See REAR BRAKE (DISC) REMOVAL/INSTALLATION.) |
|
3 |
Cap |
|
4 |
Bolt |
|
5 |
Caliper (See Caliper Installation Note.) |
|
6 |
Disc pad |
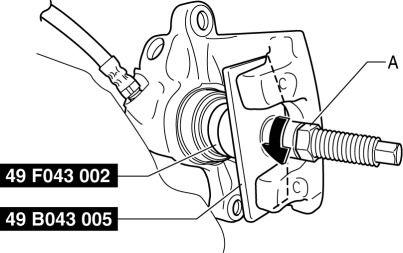
Caliper Installation Note
1. Clean the exposed area of the piston.
2. Install the SST
(49 F043 002) to the SST
(49 B043 005).
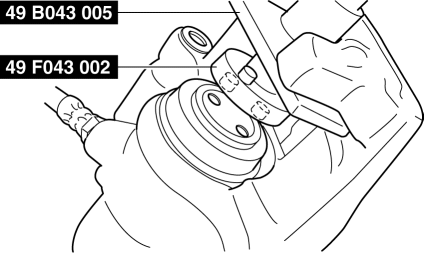
3. Align the SST
projection to the piston groove.
4. Rotate part A on the SST
in the direction of the arrow and secure the SST
to the caliper.
5. Rotate the SST
in the direction of the arrow and push the piston completely into the caliper.
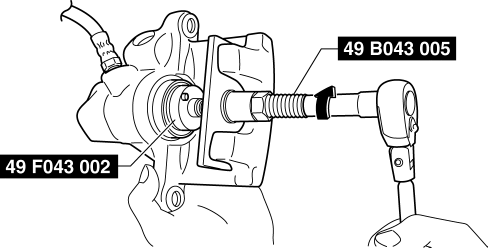
NOTE:
-
Even with the piston completely pushed in, the top of the piston projects from the dust seal by approximately 2 mm
{0.09 in}
.
6. Rotate part A on the SST
in the direction of the arrow using the tool and remove the SST
from the caliper.
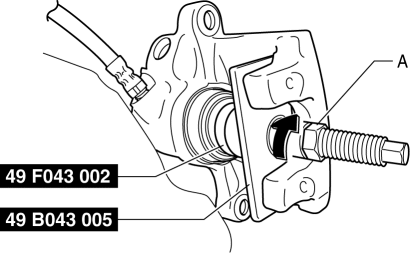
7. Install the caliper to the vehicle.
 Disc Pad (Front) Replacement [Mzr 2.3 Disi Turbo]
1. Remove in the order indicated in the table.
2. Install in the reverse order of removal.
3. After installation, pump the brake pedal a few times and verify that the brakes
do not drag.
...
 General Procedures (Brake)
Wheel and Tire Installation
1. When installing the wheels and tires, tighten the wheel nuts in a criss-cross
pattern to the following tightening torque.
Tightening torque
88—118 N· ...
Other materials:
Flywheel Inspection [C66 M R]
1. Remove the flywheel..
2. Perform the following procedures to inspect the flywheel.
If there is any malfunction or it exceeds the maximum specification, replace
the flywheel..
a. Inspect the surface that contacts the clutch disc for scratches, nicks, and
discoloration.
...
Rear Upper Arm Removal/Installation
1. When working on the right side of the vehicle, disconnect the canister vent
(CV) solenoid valve from the rear crossmember. (MZR 2.0 (Except Mexico), SKYACTIV-G
2.0, MZR 2.3 DISI Turbo, MZR 2.5 (Except Mexico))
2. Remove in the order indicated in the table.
3. Install in the reverse or ...
Headlight switch
In the Subaru Solterra, the headlight system can be controlled either
manually or automatically, offering flexibility and intelligent adaptation to changing
driving conditions.
Turning on the headlights
By operating
the switch, the lighting system of the Subaru Solterra activates in differ ...
