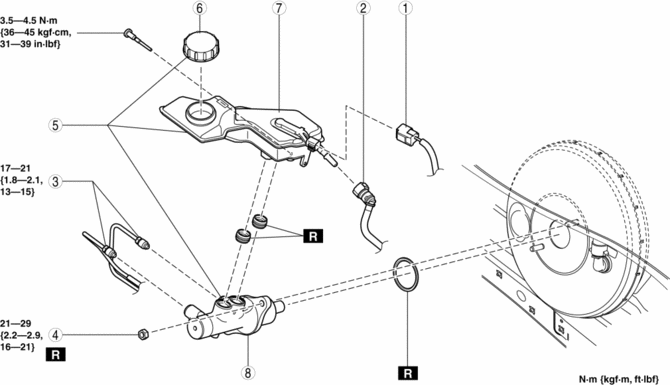
Mazda 3 Service Manual: Master Cylinder Removal/Installation [Mzr 2.0, Skyactiv G 2.0, Mzr 2.5]
1. Remove the battery and battery tray..
2. Remove in the order indicated in the table.
3. Install in the reverse order of removal.
|
1 |
Brake fluid level sensor connector |
|
2 |
Reserve hose (MTX) (See Reserve Hose (MTX) Removal Note.) (See Reserve Hose (MTX) Installation Note.) |
|
3 |
Brake pipe |
|
4 |
Nut |
|
5 |
Master cylinder |
|
6 |
Cap |
|
7 |
Reserve tank |
|
8 |
Cylinder component |
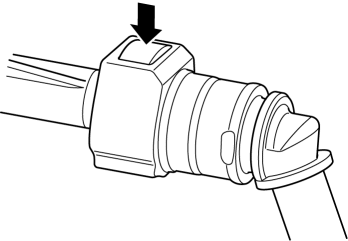
Reserve Hose (MTX) Removal Note
1. Remove the reserve hose from the reserve tank while pressing the point indicated by the arrow in the figure.
Reserve Hose (MTX) Installation Note
1. Insert the reserve hose to the reserve tank until a click is heard.
2. Verify that the reserve hose is firmly installed by pulling it, and push it into the reserve tank again.
 General Procedures (Brake)
Wheel and Tire Installation
1. When installing the wheels and tires, tighten the wheel nuts in a criss-cross
pattern to the following tightening torque.
Tightening torque
88—118 N·m { ...
 Master Cylinder Removal/Installation [Mzr 2.3 Disi Turbo]
1. Remove the battery and battery tray..
2. Pinch open the clamps using pliers and disconnect the vacuum hoses from the
insulator bracket as shown in the figure.
3. Remove in the order indic ...
Other materials:
Intermediate Sensor Inspection [FS5 A EL]
On-Vehicle Inspection
1. Inspect the power supply circuit for the intermediate sensor.
a. Set the battery component (ex: battery, battery tray and PCM component) out
of the way.
b. Disconnect the intermediate sensor connector.
c. Switch the ignition to ON (engine off).
d. Measure the ...
Neutral Switch Removal/Installation [A26 M R]
1. Disconnect the negative battery cable.
2. Disconnect the neutral switch connector.
3. Remove the aerodynamic under cover No.2..
4. Remove the neutral switch with the gasket.
5. Install a new gasket and the neutral switch to the transaxle case.
Tightening torque
29—39 N·m {3. ...
Audio Unit
NOTE:
“iPod” is a registered trademark of Apple Inc. in the United States and other
countries.
Purpose
The audio unit controls the CD, radio, exterior input devices (AUX/USB/iPod)
and the display.
Function
Records the following items which the user has set.
...
