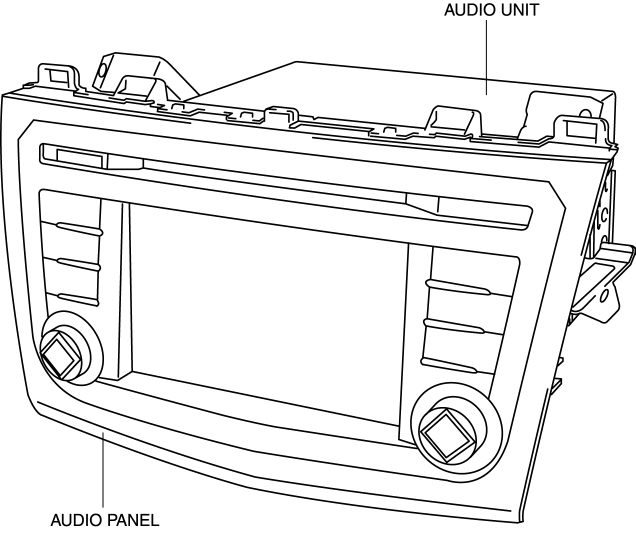
Mazda 3 Service Manual: Audio Unit
NOTE:
-
“iPod” is a registered trademark of Apple Inc. in the United States and other countries.
Purpose
-
The audio unit controls the CD, radio, exterior input devices (AUX/USB/iPod) and the display.
Function
-
Records the following items which the user has set.
|
Item |
Specification |
|
|
Preset memory |
AM |
6 |
|
FM1 |
6 |
|
|
FM2 |
6 |
|
|
SIRIUS (SAT1) |
6 |
|
|
SIRIUS (SAT2) |
6 |
|
|
SIRIUS (SAT3) |
6 |
|
-
The imbedded touch panel type display in the audio unit displays music information for CD and radio, and it also displays back camera images and the navigation screen.
-
The audio unit has the following functions:
USB/iPod applicable
-
A USB device such as USB memory or an iPod connected to the auxiliary jack/USB port can be controlled by the audio unit.
Specification
|
Item |
Specification |
||
|
Rated voltage |
(V) |
12 |
|
|
Frequency range |
AM |
(kHz) |
531—1602 |
|
FM |
(MHz) |
87.75—107.9 |
|
|
Amplifier maximum output |
(W) |
240.5 (external audio amplifier) |
|
|
Output impedance |
(ohm) |
4 |
|
|
Display |
Size |
(inches) |
480×272 (5.8) |
|
Type |
TFT *(Thin Film Transistor): Full-color |
||
* Short for Thin Film Transistor Used a lot with color LCDs.
Construction
-
An audio unit with AM/FM tuner/MP3/WMA (Windows Media Audio)/AAC (Advanced Audio Coding) applicable CD player is assembled in the audio panel.
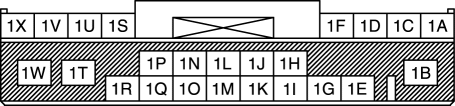
Terminal layout and signal
Audio unit
|
Terminal |
Signal |
|
|
|
1A |
Front door speaker LH (+) |
|
1B |
B+ |
|
|
1C |
Front door speaker LH (-) |
|
|
1D |
Front door speaker RH (+) |
|
|
1E |
TNS (+) |
|
|
1F |
Front door speaker RH (-) |
|
|
1G |
TNS (–) |
|
|
1H |
Steering switch3 |
|
|
1I |
Vehicle speed signal |
|
|
1J |
AMP control |
|
|
1K |
— |
|
|
1L |
— |
|
|
1M |
R position signal |
|
|
1N |
Steering switch 1 |
|
|
1O |
CAN_H |
|
|
1P |
Steering switch 2 |
|
|
1Q |
CAN_L |
|
|
1R |
ACC |
|
|
1S |
Rear door speaker LH (+) |
|
|
1T |
AudioPilot®2 |
|
|
1U |
Rear door speaker LH (-) |
|
|
1V |
Rear door speaker RH (+) |
|
|
1W |
Power ground |
|
|
1X |
Rear door speaker RH (-) |
|
|
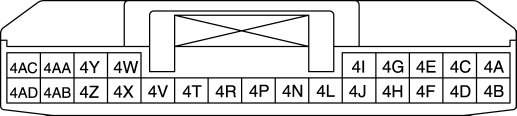
|
4A |
Bluetooth voice input RH (+) |
|
4B |
Bluetooth voice input RH (-) |
|
|
4C |
Bluetooth voice input LH (+) |
|
|
4D |
Bluetooth voice input LH (-) |
|
|
4E |
Audio voice input RH (+) |
|
|
4F |
Audio voice input RH (-) |
|
|
4G |
Audio voice input LH (+) |
|
|
4H |
Audio voice input LH (-) |
|
|
4I |
HS-CAN (+) |
|
|
4J |
HS-CAN (-) |
|
|
4L |
Microphone voice input (+) |
|
|
4N |
Microphone voice input (-) |
|
|
4P |
Microphone ground |
|
|
4R |
Microphone power supply |
|
|
4T |
Microphone detect |
|
|
4V |
— |
|
|
4W |
AUX detect |
|
|
4X |
AUX signal LH, RH (-) |
|
|
4Y |
AUX signal RH (+) |
|
|
4Z |
AUX signal LH (+) |
|
|
4AA |
— |
|
|
4AB |
— |
|
|
4AC |
— |
|
|
4AD |
— |
|
|
|
5A |
USB power supply |
|
5B |
USB data (+) |
|
|
5C |
USB power ground |
|
|
5D |
USB data (-) |
|

Antenna feeder connector
|
Terminal |
Signal |
|
|
|
3A |
ANT CONT |
|
3B |
Antenna |
|

Switch location
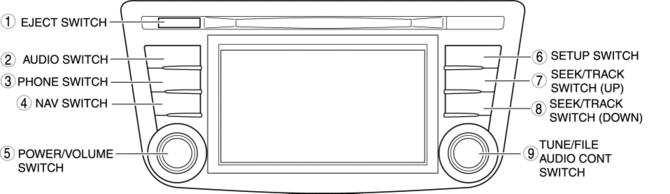
|
No. |
Switch name |
Function |
|
1 |
EJECT switch |
Ejects CD. |
|
2 |
AUDIO switch |
Switches to audio screen. |
|
3 |
PHONE switch |
Switches to Bucktooth dial screen. |
|
4 |
NAV switch |
Switches to navigation screen. |
|
5 |
POWER/VOLUME switch |
Audio power on/off and volume adjustment are possible. |
|
6 |
SETUP switch |
Switches to setting screen. |
|
7 |
SEEK/TRACK switch (up) |
|
|
8 |
SEEK/TRACK switch (down) |
|
|
9 |
TUNE/FILE AUDIO CONT switch |
|
Operation
-
For the audio unit operation, refer to the AUDIO SYSTEM.
Fail-safe
-
Function not equipped.
 Audio System
NOTE:
“iPod” is a registered trademark of Apple Inc. in the United States and other
countries.
Outline
An Auxiliary jack/USB port unit has been adopted which can connect to ...
 Audio Unit Disassembly/Assembly
CAUTION:
When disassembling the audio unit, it could get scratched if it is placed
directly on the ground. When disassembling the audio unit, spread a soft cloth
underneath to perform th ...
Other materials:
Side Panel Removal/Installation
1. Insert a tape-wrapped fastener remover into the position indicated by the
arrow in the figure.
2. Pull the side panel in the direction of the arrow shown in the figure, then
remove the clips and hook.
3. Pull the side panel in the direction of the arrow shown in the figure, while
de ...
Smart City Brake Support
(SCBS)
The Smart City Brake Support (SCBS) system is designed to reduce damage in
the event
of a collision by operating the brake control (SCBS brake) when the system's
laser sensor
(front) detects a vehicle ahead and determines that a collision with a vehicle
ahead is
unavoidable. It may also be ...
Parking in an Emergency
The hazard warning lights should always
be used when you stop on or near a
roadway in an emergency
The hazard warning lights warn other
drivers that your vehicle is a traffic hazard
and that they must take extreme caution
when near it.
Depress the hazard warning flasher and
all the t ...
