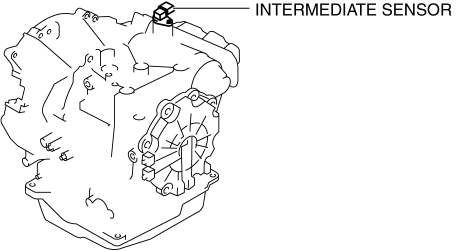
Mazda 3 Service Manual: Intermediate Sensor Inspection [FS5 A EL]
On-Vehicle Inspection
1. Inspect the power supply circuit for the intermediate sensor.
a. Set the battery component (ex: battery, battery tray and PCM component) out of the way.
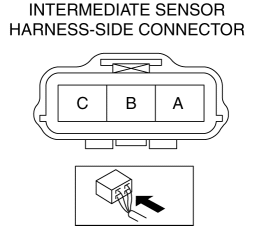
b. Disconnect the intermediate sensor connector.
c. Switch the ignition to ON (engine off).
d. Measure the voltage at intermediate sensor connector terminal A (harness-side).
-
If there is any malfunction, repair wiring harness between intermediate sensor and AT main relay.
-
Intermediate sensor specification
-
B+
e. Switch the ignition to off.
f. Connect the intermediate sensor connector.
2. Inspect the GND circuit for the intermediate sensor.
a. Switch the ignition to off.
b. Measure the voltage at intermediate sensor connector terminal C (harness-side).
-
If there is any malfunction, repair wiring harness between intermediate sensor and GND.
-
Intermediate sensor specification
-
Below 1.0 V
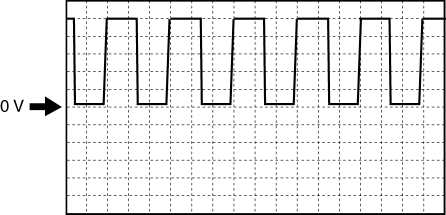
3. Inspect the signal circuit for the intermediate sensor.
a. Connect the oscilloscope to the following TCM connector terminals and set it as below.
-
(+) lead: TCM terminal AC
-
(-) lead: battery negative terminal
-
Oscilloscope setting: 1 V/DIV (Y), 200 μs/DIV (X), DC range
b. Start the engine.
c. Measure the wave form when the following conditions are met.
-
Gear position: 3GR
-
Vehicle speed: 30 km/h {19 mph}
-
If there is any malfunction, replace the intermediate sensor..
 Initial Learning [Fw6 A EL]
Introduction
If the control valve body and oil pressure switch are replaced, always perform
the initial learning. If the initial learning is not completed, engine rev-up
may occur or shif ...
 Intermediate Sensor Removal/Installation [FS5 A EL]
CAUTION:
If foreign materials are stuck to the sensor, disturbance by magnetic flux
can cause sensor output to be abnormal and thereby negatively affect control.
Make sure that foreign m ...
Other materials:
Sunroof Switch Inspection
NOTE:
The sunroof switch is together with the front map light.
1. Disconnect the negative battery cable..
2. Remove the map light from the headliner..
3. Inspect for continuity between the sunroof switch terminals using an ohmmeter.
If not as specified, replace the sun ...
Trunk Lid Key Cylinder Removal/Installation
1. Disconnect the negative battery cable..
2. Remove the trunk lid trim..
3. Lift the clip in the direction of the arrow (1), and pull out the key rod
in the direction of the arrow (2).
4. Remove the nuts.
5. Remove the trunk lid key cylinder.
6. Install in the reverse order of r ...
Controller Area Network (Can) System
Outline
With the addition of the following, the system wiring diagram and CAN communication
table have been added.
USB adapter
System Wiring Diagram
CAN Signal Table
Signals transmitted using the CAN system are as follows:
MS-CANOUT: Output (send ...
