Mazda 3 Service Manual: Caliper (Front) Disassembly/Assembly [Mzr 2.3 Disi Turbo]
1. Disassemble in the order indicated in the table.
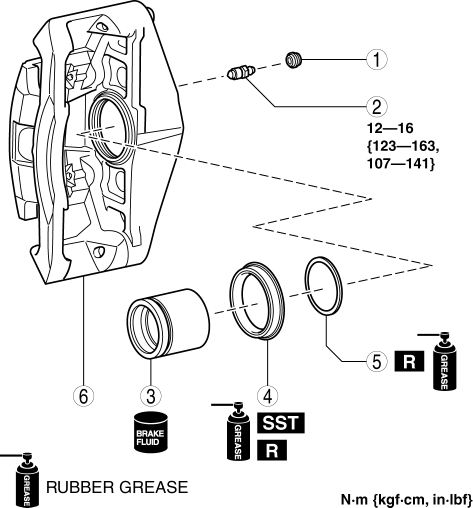
|
1 |
Bleeder cap |
|
2 |
Bleeder screw |
|
3 |
Piston (See Piston Disassembly Note.) (See Piston Assembly Note.) |
|
4 |
Dust seal (See Dust Seal Assembly Note.) |
|
5 |
Piston seal |
|
6 |
Caliper body |
2. Assemble in the reverse order of disassembly.
Piston Disassembly Note
1. Insert a piece of wood in the caliper as shown in the figure and blow compressed air through the bleeder screw installation hole to remove the piston from the caliper body.
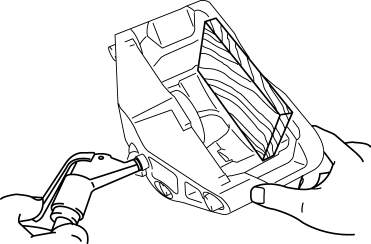
WARNING:
-
When compressed air is blown into the caliper body, injury to a finger or other part from pinching could result from the piston springing up. When blowing in compressed air, do not place your fingers between the piston and caliper body when performing the work.
CAUTION:
-
The piston could be damaged if blown out with great force. Blow the compressed air slowly to prevent the piston from suddenly popping out.
Dust Seal Assembly Note
1. Assemble a new dust seal to the caliper using the SSTs
and a press with a press-in force of 834 N {85 kgf, 187 in·lbf}
.
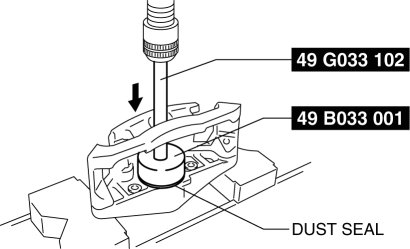
2. Verify that there is no gap between the dust seal and caliper body.
Piston Assembly Note
1. Press the piston into the dust seal opening as shown in the figure.
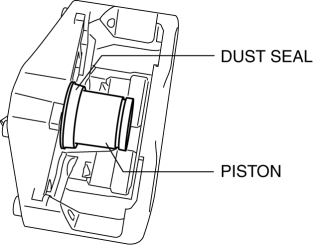
2. Insert a piece of wood between the caliper body and the piston, and while supporting the piston by hand, blow compressed air through the brake hose installation hole.

WARNING:
-
When blowing compressed air into the caliper body, the piston may pop out and cause injury if not supported at the correct point. Securely support the piston friction surface by hand when blowing compressed air.
NOTE:
-
By blowing compressed air, the dust seal expands due to air pressure and covers the piston end.
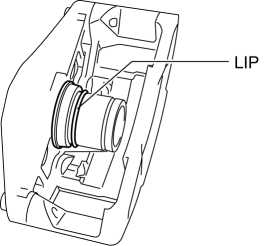
3. Verify that the dust seal lip covers the piston end as shown in the figure.
4. Press the piston into the caliper body completely.
 Caliper (Front) Disassembly/Assembly [Mzr 2.0, Skyactiv G 2.0, Mzr 2.5]
1. Disassemble in the order indicated in the table.
1
Bleeder cap
2
Bleeder screw
3
Piston
(See Piston Disassem ...
 Caliper (Rear) Disassembly/Assembly
1. Disassemble in the order indicated in the table.
1
Dust seal
(See Dust Seal Assembly Note.)
2
Bleeder cap
3
...
Other materials:
Jacking Positions, Vehicle Lift (2 Supports) And Safety Stand (Rigid Rack) Positions
Jacking Positions
WARNING:
Improperly jacking a vehicle is dangerous. The vehicle can slip off the jack
and cause serious injury. Use only the correct front and rear jacking points
and block the wheels.
Use safety stands to support the vehicle after it has been lifted.
...
Spark Plug Inspection [Mzr 2.3 Disi Turbo]
Specification
Spark plug type
L3BD-18110, L3YD-18110
Plug Gap Inspection
CAUTION:
To avoid possible damage to the tip, do not adjust the plug gap.
To prevent damaging the tip, use a wire type plug gap gauge when inspecting
the plug gap.
1. Measure the spark p ...
Engine Tune Up [Mzr 2.3 Disi Turbo]
NOTE:
If the accelerator pedal is depressed continuously for a specified time,
the engine speed may decrease to the idle speed. This is due to the fuel cut
control operation, which prevents overheating, and it does not indicate a malfunction.
Engine Tune-up Preparation
1. Verify ...
