Mazda 3 Service Manual: Rear Crossmember Removal/Installation
CAUTION:
-
Performing the following procedures without first removing the ABS wheel-speed sensor may possibly cause an open circuit in the wiring harness if it is pulled by mistake. Before performing the following procedures, disconnect the ABS wheel-speed sensor wiring harness connector (axle side) and fix the wiring harness to an appropriate place where it will not be pulled by mistake while servicing the vehicle.
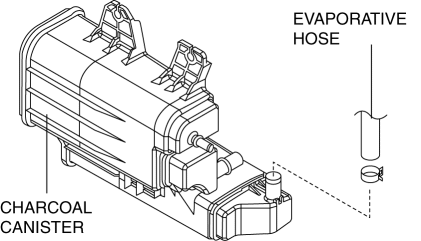
1. Remove the charcoal canister. (MZR 2.0 (Mexico), MZR 2.5 (Mexico)).
2. Disconnect the evaporative hose. (MZR 2.0 (Except Mexico), SKYACTIV-G 2.0, MZR 2.3 DISI Turbo, MZR 2.5 (Except Mexico))
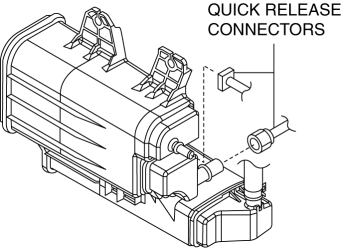
3. Disconnect the quick release connectors. (MZR 2.0 (Except Mexico), SKYACTIV-G 2.0, MZR 2.3 DISI Turbo, MZR 2.5 (Except Mexico)). REMOVAL/INSTALLATION [MZR 2.3 DISI Turbo]
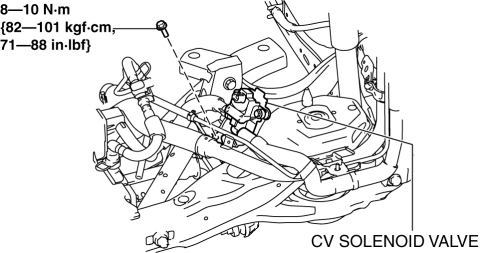
4. Remove the CV solenoid valve from the rear crossmember. (MZR 2.0 (Except Mexico), SKYACTIV-G 2.0, MZR 2.3 DISI Turbo, MZR 2.5 (Except Mexico))
5. Disconnect the wiring harness connecting to the rear crossmember.
6. Remove the auto leveling sensor. (Vehicles with AFS).
7. Remove the rear stabilizer..
8. Remove the rear coil spring..
9. Remove the rear lower arm..
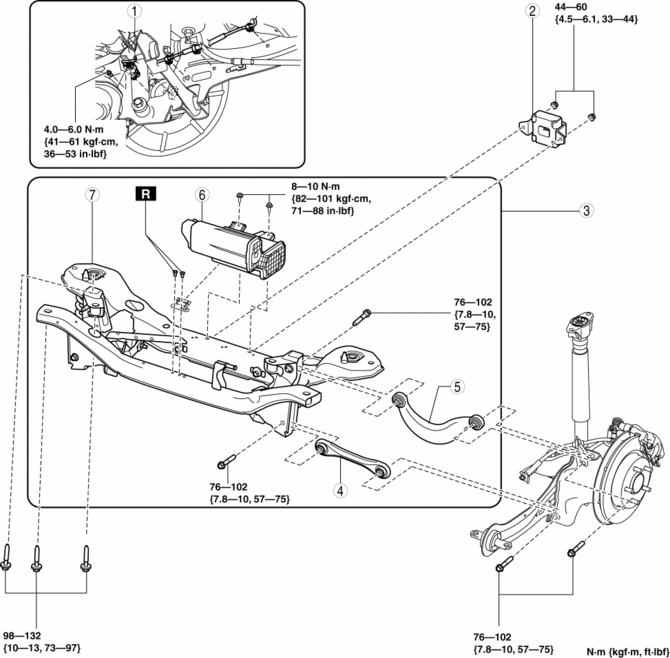
10. Remove in the order indicated in the table.
11. Install in the reverse order of removal.
12. Inspect the wheel alignment and adjust it if necessary..
|
1 |
Rear ABS wheel-speed sensor wiring harness (See Rear ABS Wheel-speed Sensor Wiring Harness Installation Note.) |
|
2 |
Dynamic damper |
|
3 |
Rear crossmember component . |
|
4 |
Rear lateral link . |
|
5 |
Rear upper arm . |
|
6 |
Charcoal canister (MZR 2.0 (Except Mexico), SKYACTIV-G 2.0, MZR 2.3 DISI Turbo, MZR 2.5 (Except Mexico)) . |
|
7 |
Rear crossmember |
Rear Crossmember Component Removal Note
WARNING:
-
Verify that the crossmember is securely supported by a jack. If the rear crossmember falls off, it can cause serious injury or death, and damage to the vehicle.
1. Support the rear crossmember with the jack and remove the bolt.
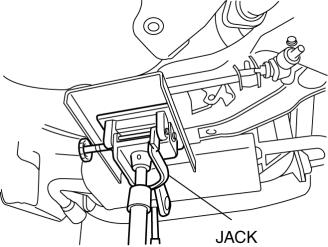
2. Remove the rear crossmember component.
Rear Crossmember Component Installation Note
WARNING:
-
Verify that the crossmember is securely supported by a jack. If the rear crossmember falls off, it can cause serious injury or death, and damage to the vehicle.
1. Support the rear crossmember component and install the rear crossmember.
Rear ABS Wheel-speed Sensor Wiring Harness Installation Note
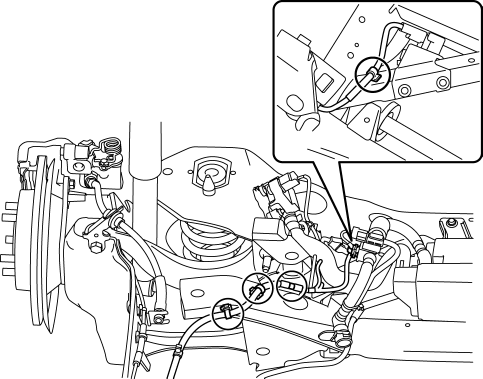
1. Pass the rear ABS wheel-speed sensor wiring harness outside the rear parking brake cable as shown in the figure.
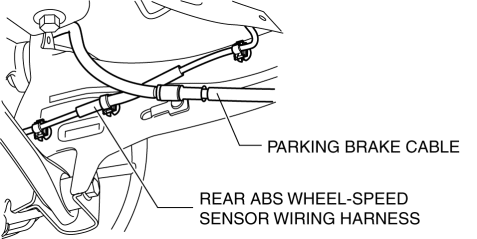
2. Install the rear ABS wheel-speed sensor wiring harness.
 Front Crossmember Removal/Installation
CAUTION:
Performing the following procedures without first removing the ABS wheel-speed
sensor may possibly cause an open circuit in the wiring harness if it is pulled
by mistake. Before ...
 Rear Seat Back Frame Removal/Installation
1. Remove the rear seat cushion..
2. Remove the rear buckle installation bolt..
3. Remove the rear seat back..
4. Remove the headrest.
5. Open the fasteners.
6. Detach the hooks.
7. ...
Other materials:
Front Door Latch And Lock Actuator Inspection
1. The following actuators and switches are integrated with the front door latch
and lock actuator. Inspect the front door latch and lock actuator according to each
inspection procedure for the following items.
Front door lock actuator.
Door lock-link switch.
Door latch s ...
Power Outer Mirror Switch Inspection
1. Disconnect the negative battery cable..
2. Remove the following parts:
a. Inner garnish.
b. Front door trim.
c. Switch panel.
3. Verify that the continuity between the power outer mirror switch terminals
is as indicated in the table.
If not as indicated in the table, replace t ...
Hood Disassembly/Assembly
Except Mazdaspeed3
1. Disassemble in the order indicated in the table.
1
Weather strip parting seal
2
Weather strip shroud seal
3
Fasteners A
4
Fasteners B
5
...
