Mazda 3 Service Manual: Caliper (Front) Disassembly/Assembly [Mzr 2.0, Skyactiv G 2.0, Mzr 2.5]
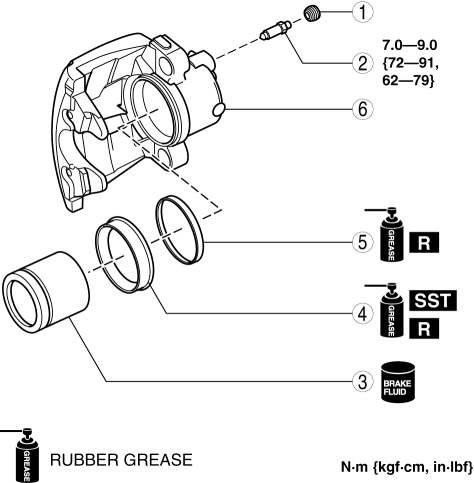
1. Disassemble in the order indicated in the table.
|
1 |
Bleeder cap |
|
2 |
Bleeder screw |
|
3 |
Piston (See Piston Disassembly Note.) (See Piston Assembly Note.) |
|
4 |
Dust seal (See Dust Seal Assembly Note.) |
|
5 |
Piston seal |
|
6 |
Caliper body |
2. Assemble in the reverse order of disassembly.
Piston Disassembly Note
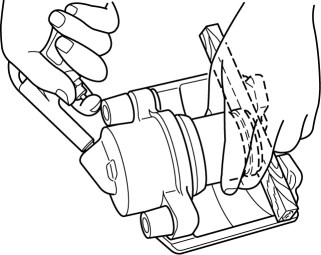
1. Insert a piece of wood in the caliper as shown in the figure and blow compressed air through the bleeder screw installation hole to remove the piston from the caliper body.
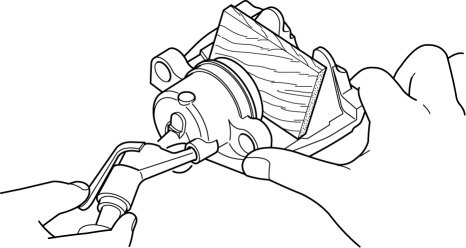
WARNING:
-
When compressed air is blown into the caliper body, injury to a finger or other part from pinching could result from the piston springing up. When blowing in compressed air, do not place your fingers between the piston and caliper body when performing the work.
CAUTION:
-
The piston could be damaged if blown out with great force. Blow the compressed air slowly to prevent the piston from suddenly popping out.
Dust Seal Assembly Note
1. Assemble a new dust seal to the caliper using the SSTs
and a press with a press-in force of 834 N {85 kgf, 187 in·lbf}
.
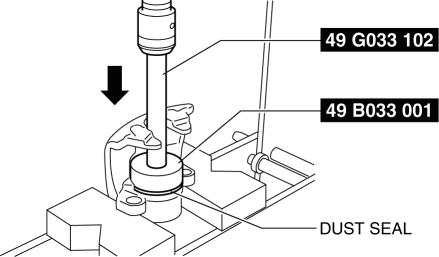
2. Verify that there is no gap between the dust seal and caliper body.
Piston Assembly Note
1. Press the piston into the dust seal opening as shown in the figure.
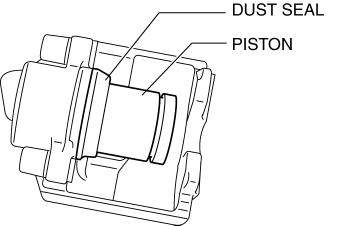
2. Insert a piece of wood between the caliper body and the piston, and while supporting the piston by hand, blow compressed air through the brake hose installation hole.
WARNING:
-
When blowing compressed air into the caliper body, the piston may pop out and cause injury if not supported at the correct point. Securely support the piston friction surface by hand when blowing compressed air.
NOTE:
-
By blowing compressed air, the dust seal expands due to air pressure and covers the piston end.
3. Verify that the dust seal lip covers the piston end as shown in the figure.

4. Press the piston into the caliper body completely.
 Disc Brakes
...
 Caliper (Front) Disassembly/Assembly [Mzr 2.3 Disi Turbo]
1. Disassemble in the order indicated in the table.
1
Bleeder cap
2
Bleeder screw
3
Piston
(See Piston Disassem ...
Other materials:
Fuel Gauge
The fuel gauge shows approximately
how much fuel is remaining in the tank
when the ignition is switched ON. We
recommend keeping the tank over 1/4 full.
Type A/Type B instrument cluster
Type C instrument cluster
If the low fuel warning light illuminates or
the fuel level is very low, ...
Pre-programming the HomeLink
System
NOTE
It is recommended that a new battery be
placed in the hand-held transmitter of the
device being programmed to HomeLink
for quicker training and accurate
transmission of the radio-frequency signal.
Verify that there is a remote control
transmitter available for the device you
would ...
Ion Sensor Inspection [Skyactiv G 2.0]
DTC Inspection
NOTE:
Because the ion sensor is integrated in the ignition coil, replacing the
ion sensor includes replacement of the ignition coil/ion sensor.
1. Connect the M-MDS to the DLC-2.
2. Perform the DTC inspection using the M-MDS..
If any DTC related to the ...
