Mazda 3 Service Manual: Outer Mirror Glass Removal
1. Disconnect the negative battery cable.
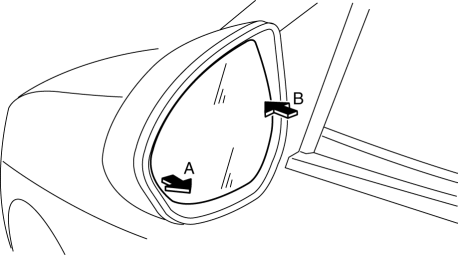
2. Press area B of the mirror glass so that area A moves outward.

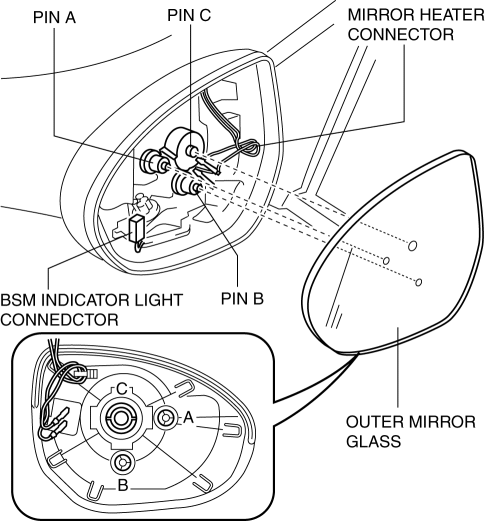
3. Detach pin B while lifting up the inside of the mirror glass holder.

4. Pull the mirror glass holder and remove pins A and C.
5. Disconnect the mirror heater connectors. (Vehicles with heated outer mirrors)
6. Disconnect the BSM indicator connector. (Vehicles with BSM system)
7. Remove the mirror glass holder and the outer mirror glass as a single unit.
 Outer Mirror Glass Installation
1. Connect the mirror heater connectors. (Vehicles with heated outer mirrors)
2. Connect the BSM indicator light connector. (Vehicles with BSM system)
3. Press part C on the outer mirror glass an ...
 Power Outer Mirror Inspection
Mirror Glass Adjustment Motor
1. Disconnect the negative battery cable..
2. Remove the inner garnish..
3. Disconnect the power outer mirror connector.
4. Remove the front door trim..
5. Apply ...
Other materials:
Global Positioning System (Gps) Antenna Removal/Installation
With Audio Unit (Without Display)
1. Disconnect the negative battery cable..
2. Remove the following parts:
a. Upper column cover.
b. Instrument cluster.
3. Remove in the order indicated in the table.
1
Connector
2
Screw
...
Liftgate Latch Switch Inspection
1. Disconnect the negative battery cable..
2. Remove the following parts:
a. Liftgate upper trim.
b. Liftgate side trim.
c. Liftgate lower trim.
d. Liftgate latch and lock actuator.
3. Press the latch in using a flathead screwdriver to inspect the latch lever
condition.
4. Verify ...
Windshield Defrosting and
Defogging
Press the windshield defroster switch.
In this position, the outside air position
is automatically selected, and the air
conditioner automatically turns on. The
air conditioner will directly dehumidify
the air to the front windshield and side
windows (on ). Airflow
amount will be increased. ...
