
Mazda 3 Owners Manual: Locking, Unlocking with Key
All doors and the liftgate lock automatically when the driver's door is locked using the auxiliary key.
All doors and the liftgate unlock when the driver's door is unlocked and the auxiliary key is held in the unlock position for one second or longer.
Turn the auxiliary key toward the front to lock, toward the back to unlock.
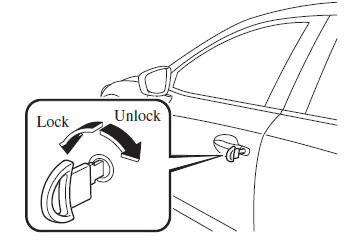
NOTE Holding the auxiliary key in the unlocked position in the driver's door lock for about a second unlocks all doors and the liftgate.
To unlock only the driver's door, insert the auxiliary key into the driver's door lock and turn the auxiliary key briefly to the unlock position and then immediately return it to the center position.
 Operational Range
WARNING
Always take all children and pets with
you or leave a responsible person with
them:
Leaving a child or a pet unattended in
a parked vehicle is dangerous. In hot
weathe ...
 Locking, Unlocking with Request
Switch (With the advanced keyless
function)
Locking, Unlocking with Request
Switch (With the advanced keyless
function)
All doors and the liftgate can be locked/
unlocked by pressing the request switch
on the front doors while the key is being
carried.
(5–door)
The request switch on the liftgate can only
be use ...
Other materials:
Oil Control Valve (OCV) Inspection [Mzr 2.0, Mzr 2.5]
Coil Resistance Inspection
1. Remove the battery cover..
2. Disconnect the negative battery cable..
3. Remove the plug hole plate..
4. Disconnect the OCV connector.
5. Measure the resistance between terminals A and B using an ohmmeter.
OCV coil resistance
6.9—7.9 ohms [20°C ...
Windshield Wipers
Turn the wipers on by pressing the lever
up or down.
With intermittent wiper
Variable-speed intermittent wipers
Set the lever to the intermittent position
and choose the interval timing by rotating
the ring.
With auto-wiper control
Auto-wiper control
When the wiper lever is ...
Bluetooth®
Bluetooth ® Hands-Free outline
When a Bluetooth ® device (mobile phone) is connected to the vehicle's
Bluetooth ® unit via
radio wave transmission, a call can be made or received by pressing the talk
button, pickup
button, or hang-up button on the audio remote control switch, or by operati ...
