Mazda 3 Service Manual: Power Systems Personalization Features Setting Procedure
NOTE:
-
Use the IDS (laptop PC) because the PDS (Pocket PC) does not support the POWER SYSTEMS PERSONALIZATION FEATURES SETTING PROCEDURE.
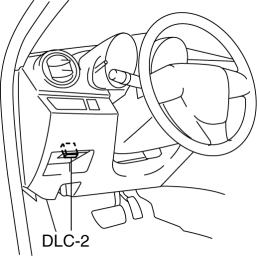
1. Connect the M-MDS to the DLC–2.
2. After the vehicle is identified, select the following items from the initial screen of the M-MDS.
-
Select the “Module Programming”.
3. Then, select items from the screen menu in the following order.
-
Select “Programmable Parameters”.
-
Select “RKE”.
4. Select an item name, and then select option.
|
M-MDS display |
Function |
Initial setting |
Setting content |
Control unit |
|
ACC auto off |
The function to automatically switch off the ignition after one hour has elapsed since the ignition was switched to ACC can be set to operable or inoperable. |
Enabled |
Disabled/Enabled |
Keyless control module |
|
Power off mode |
The transition pattern in which the ignition position is switched by pressing the push button start can be selected. |
Direct |
Direct/Stepwise |
Keyless control module |
 Key Reminder Switch Removal/Installation
1. Disconnect the negative battery cable. (See BATTERY REMOVAL/INSTALLATION [MZR
2.0, MZR 2.5].)(See BATTERY REMOVAL/INSTALLATION [MZR 2.3 DISI Turbo].)(See BATTERY
REMOVAL/INSTALLATION [SKYACTIV- ...
 Pre Delivery Inspection
Pre-Delivery Inspection Table
Exterior
INSPECT and ADJUST, if necessary, the following items to specification:
□ Glass, exterior bright metal and paint for damage
□ Wheel lug nuts ...
Other materials:
Front Seat Slide Adjuster Removal/Installation
WARNING:
Handling the front seats improperly can accidentally deploy the side air
bag, which may seriously injure you. Read air bag system service warnings and
cautions before handling the front seats..
CAUTION:
After removing a front seat, do not operate the slider leve ...
No.7 Bsm Indicator Light Does Not Flash While Under Bsm Indicator Light Flashing
Conditions (With Combination Switch Operation (Turn Signal Switch)) [Blind Spot
Monitoring (Bsm)]
7
BSM indicator light does not flash while under BSM indicator light-flashing
conditions (with combination switch operation (turn signal switch))
Description
The BSM indicator light does not flash or illuminate continuously,
...
Accessory Socket Inspection
Front
1. Disconnect the negative battery cable..
2. Remove the upper panel..
3. Remove the shift lever knob. (MTX).
4. Remove the selector lever knob. (ATX).
5. Remove the shift panel.
6. Remove the accessory socket (front).
7. Connect a tester as shown in the figure and verify that the ...
