Mazda 3 Owners Manual: Replacing a Tire
| WARNING Always use tires that are in good condition: Driving with worn tires is dangerous. Reduced braking, steering, and traction could result in an accident. |
If a tire wears evenly, a wear indicator will appear as a solid band across the tread.
Replace the tire when this happens.
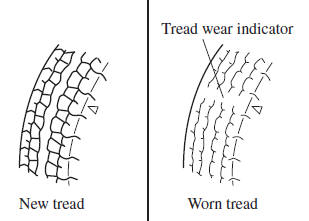
You should replace the tire before the band crosses the entire tread.
(With tire pressure monitoring system)
After adjusting the tire pressure, initialization of the tire pressure monitoring system is necessary to make the system operate normally.
Refer to Tire Pressure Monitoring System Initialization on .
NOTE Tires degrade over time, even when they are not being used on the road. It is recommended that tires generally be replaced when they are 6 years or older. Heat caused by hot climates or frequent high loading conditions can accelerate the aging process. You should replace the spare tire when you replace the other road tires due to the aging of the spare tire. The period in which the tire was manufactured (both week and year) is indicated by a 4-digit number.
Refer to Tire Labeling on .
 Tire Rotation
To equalize tread wear, rotate the tires every 12,000 km (7,500 miles) at the
latest or sooner
if irregular wear develops. Mazda recommends to rotate every 8,000 km (5,000
miles) to
help increas ...
 Safety Practices
The way you drive has a great deal to do with your tire mileage and safety.
So cultivate good
driving habits for your own benefit.
Observe posted speed limits and drive at speeds that are safe ...
Other materials:
Crankshaft Position (CKP) Sensor Inspection [Mzr 2.0, Mzr 2.5]
Visual Inspection
CAUTION:
When foreign material such as an iron chip is on the CKP sensor, it can cause
abnormal output from the sensor because of flux turbulence and adversely affect
the engine control. Be sure there is no foreign material on the CKP sensor when
replacing.
...
Charcoal Canister Inspection [Mzr 2.0, Mzr 2.5]
Leakage Inspection
1. Perform the following procedures:
Assemble the hose used for inspection to port A.
Cover ports B and C with the caps.
Except for Mexico
Mexico
CAUTION:
Do not apply a pressure 20 kPa {150 mmHg, 5.91 inHg} or more to the charcoal
cani ...
Emergency assistance
SUBARU SOLTERRA CONNECT
SUBARU SOLTERRA CONNECT is an advanced subscription-based telematics
system designed for the Subaru Solterra, utilizing Global Positioning System (GPS)
technology along with integrated cellular communication to deliver enhanced safety,
security, and convenience feature ...
