
Mazda 3 Service Manual: Roof Molding Removal
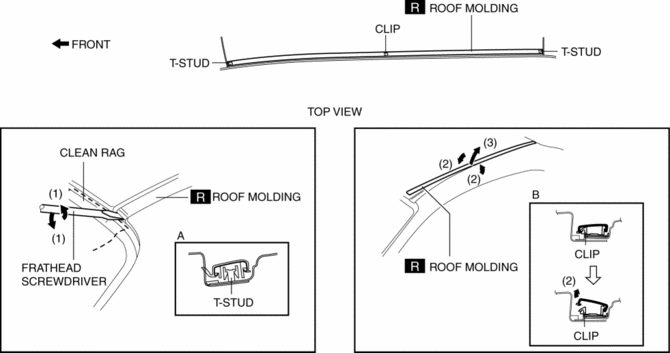
1. Insert a fastener remover in the position shown in the figure.
2. Rotate the flathead screwdriver in the direction of the arrow (1) shown in the figure and remove the roof molding from the T-stud (figure A).
3. Rotate the roof molding in the direction of the arrow (2) shown in the figure, pull up the roof molding in the direction of the arrow (3) while detaching it from the clip (figure B), and then remove the roof molding.
 Roof Molding Installation
1. Install the roof molding to the front T-stud.
2. Hook the roof molding to the clip and attach the roof molding while pressing
it in the direction of the arrow shown in the figure.
3. Inst ...
 Seats
Seats
...
Other materials:
Front Brake (Disc) Inspection
Brake Judder Repair Hints
Description
1. Brake judder concern has the following 3 characteristics:
Steering wheel vibration
1. The steering wheel vibrates in the rotation direction. This characteristic
is most noticeable when applying brakes at a vehicle speed of 100—140 km/h {62.2—86.9
...
Dehumidifying (With air
conditioner)
Operate the air conditioner in cool or cold
weather to help defog the windshield and
side windows.
Set the mode selector dial to the desired
position.
Set the air intake selector to the outside
air position.
Set the temperature control dial to the
desired position.
Set the fan cont ...
Brake/Taillight Bulb Removal/Installation
4SD
1. Disconnect the negative battery cable..
2. Remove the following parts:
a. Trunk mat.
b. Trunk board.
c. Trunk end trim.
3. Partially peel back the trunk side trim..
4. Remove in the order indicated in the table.
1
Connector
2
...
