Mazda 3 Service Manual: Receiver/Drier Removal/Installation
MZR 2.0, MZR 2.5, SKYACTIV-G 2.0
1. Disconnect the negative battery cable..
2. Discharge the refrigerant..
3. Remove the aerodynamic under cover No.2..
4. Remove the aerodynamic under cover No.1..
5. Remove the front bumper..
6. Disconnect the block joint type pipes by grasping female side of the block with hand holding firmly then loosen the connection bolt A.
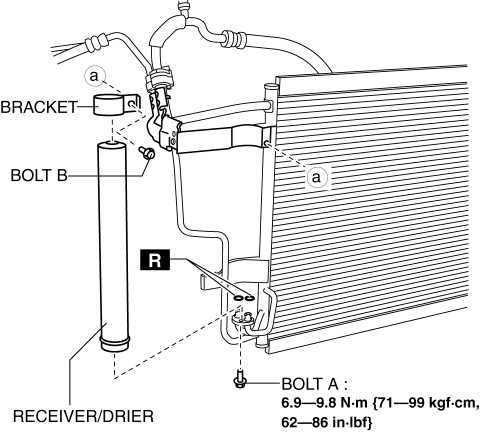
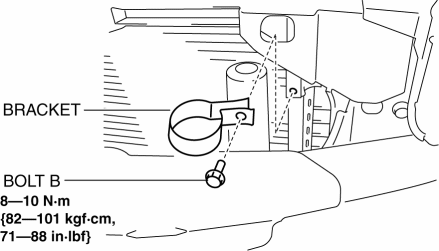
7. Remove the bolt B.
8. Remove the bracket.
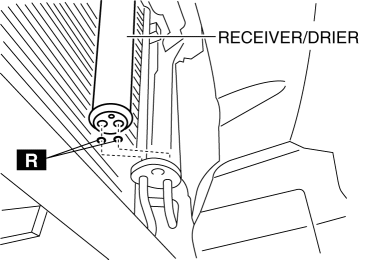
9. Remove the receiver/drier. Do not allow compressor oil to spill.
CAUTION:
-
If moisture or foreign material enters the refrigeration cycle, cooling ability will be lowered and abnormal noise will occur. Always immediately plug all open fittings after removing any refrigeration cycle parts to keep moisture or foreign material out of the cycle.
10. Install in the reverse order of removal.
11. Perform the refrigerant system performance test..
MZR 2.3 DISI Turbo
1. Disconnect the negative battery cable..
2. Discharge the refrigerant..
3. Remove the aerodynamic under cover No.2..
4. Remove the aerodynamic under cover No.1..
5. Remove the front bumper..
6. Disconnect the block joint type pipes by grasping female side of the block with hand holding firmly then loosen the connection bolt A.

7. Remove the bolt B.
8. Remove the bracket.
9. Remove the receiver/drier. Do not allow compressor oil to spill.
CAUTION:
-
If moisture or foreign material enters the refrigeration cycle, cooling ability will be lowered and abnormal noise will occur. Always immediately plug all open fittings after removing any refrigeration cycle parts to keep moisture or foreign material out of the cycle.
10. Install in the reverse order of removal.
11. Perform the refrigerant system performance test..
 Power Metal Oxide Semiconductor Field Effect Transistor (Power Mos Fet) Removal/Installation
[Full Auto Air Conditioner]
Power Metal Oxide Semiconductor Field Effect Transistor (Power Mos Fet) Removal/Installation
[Full Auto Air Conditioner]
1. Disconnect the negative battery cable..
2. Remove the dashboard under cover..
3. Disconnect the connector.
4. Remove the screw.
5. Remove the power MOS FET.
6. Install in the reverse ...
 Evaporator Temperature Sensor Inspection [Full Auto Air Conditioner]
NOTE:
Inspect the evaporator temperature sensor when it is installed to the A/C
unit.
1. Set the fan speed MAX HI.
2. Set the temperature control at MAX COLD.
3. Set the RECIRCULA ...
Other materials:
Keyless Antenna Removal/Installation
Interior, Front
1. Disconnect the negative battery cable..
2. Remove the following parts:
a. Upper panel.
b. Shift knob (MTX).
c. Selector lever knob (ATX).
d. Shift panel.
e. Side wall.
f. Center panel.
g. Audio unit.
h. Rear heat duct (1).
3. Disconnect the connector.
4. ...
Hood Latch And Release Lever Removal/Installation
Hood latch
1. Open the hood.
2. Disconnect the negative battery cable..
3. Disconnect the hood latch switch connector. (vehicles with theft-deterrent
system)
4. Remove the bolts.
5. Remove the hood latch.
6. Install in the reverse order of removal.
7. Adjust the hood..
Hood ...
Antenna Feeder No.7 Removal/Installation
1. Disconnect the negative battery cable..
2. Remove the liftgate upper trim..
3. Disconnect the connector A.
4. Disconnect the connector B..
5. Remove the bolt.
6. Remove the antenna feeder No.7.
7. Install in the reverse order of removal.
Connector B Removal Note
1. Remove the c ...
