Mazda 3 Service Manual: Passenger Compartment Temperature Sensor Inspection [Full Auto Air Conditioner]
1. Measure the temperature around the passenger compartment temperature sensor and measure the resistance between passenger compartment temperature sensor terminals B and D.
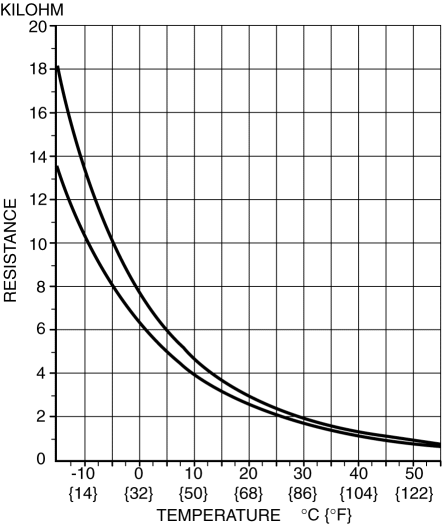
-
If the characteristics of the passenger compartment temperature sensor are not as shown in the graph, replace the passenger compartment temperature sensor.
2. Connect battery positive voltage to passenger compartment temperature sensor terminal A and connect terminal C to ground to verify fan operation.

-
If there is any malfunction, replace the passenger compartment temperature sensor.
 Manifold Absolute Pressure (Map) Sensor/Boost Air Temperature Sensor Removal/Installation
[Mzr 2.3 Disi Turbo]
Manifold Absolute Pressure (Map) Sensor/Boost Air Temperature Sensor Removal/Installation
[Mzr 2.3 Disi Turbo]
NOTE:
Because the boost air temperature sensor is integrated in the MAP sensor,
replacing the boost air temperature sensor includes replacement of the MAP sensor/boost
air temperature se ...
 Passenger Compartment Temperature Sensor Removal/Installation [Full Auto Air
Conditioner]
Passenger Compartment Temperature Sensor Removal/Installation [Full Auto Air
Conditioner]
1. Disconnect the negative battery cable..
2. Remove the following parts:
a. Front scuff plate.
b. Front side trim.
c. Dashboard under cover.
d. Upper panel.
e. Shift lever knob (MTX).
f ...
Other materials:
Control Switches
Temperature control dial
This dial controls temperature. Turn it
clockwise for hot and counterclockwise
for cold.
NOTE
When the mode is set to or
with the
fan control dial in a position other than 0
and the temperature control dial in the
maximum cold position, the air intake
selector ...
Brake/Clutch Fluid
Inspecting Brake/Clutch Fluid Level
WARNING
If the brake/clutch fl uid level is low, have
the brakes inspected:
A low brake/clutch fl uid level is
dangerous.
A low level could indicate brake lining
wear or a brake system leak which
could cause the brakes to fail and lead ...
Engine Disassembly/Assembly [Mzr 2.0, Mzr 2.5]
1. Remove the engine from the transaxle..
2. Remove the generator..
3. Remove the exhaust system..
4. Remove the EGR valve..
5. Remove the intake-air system..
6. Remove the fuel injectors..
7. Remove the ignition coils..
8. Remove the crankshaft position (CKP) sensor..
9. Disassemble ...
